EN ISTRUCTION MANUAL PELLET STOVES PELLET KITCHEN PELLET INSERTS AIR STOVE AIR-TIGHT STOVES PELLET STOVES WITH OVEN PELLET KITCHEN WITH OVEN
IMPORTANT: READ THE FOLLOWING INFORMATION 1. The warranty is valid in the presence of a certified installation by AUTHORIZED PERSONNEL. 2. DO NOT TURN THE PRODUCT UPSIDE DOWN or LAY IT IN A HORIZONTAL POSITION during transportation and installation. 3. Stove installation must be carried out by qualified staff and pursuant to the regulations in force in the relevant country. 4. EMPTY THE BURN POT before trying to switch the stove back on in case of ignition failure or power outage.
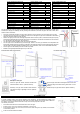
F-1 F-2 F-3 F-4 3
F-5 14:24 26.0 p-3 spento F-6 LUNEDI’ 07/03/2016 11:54 12 F-7 4 18.
TABLE OF CONTENTS 01. PRODUCT SAFETY …………..………………………………………………………………………………………………….….. p. 6 02. VENT PIPE ……………..………………………..……………………………………………………………………………………. p. 7 02.01 CHIMNEY COWL ……………………………………………………………………………………………………………. 02.02 DRAUGHT……………………………………………………………………………………………………..……………… 02.03 STOVE EFFICIENCY………………………………………………………………………………………………………… p. 8 p. 9 p. 9 03. WARNINGS ISTALLATION ………………………………………………………………………………………………………….. p. 9 04. INSTALLATION…………………………….…………………………………………………………………………………………..
01. PRODUCT SAFETY SAFETY WARNINGS The stoves were built in compliance according to standard EN13240 (wood stoves), EN 14785 (pellet stoves) and EN 12815 (kitchens and wood-burning stoves) using high quality and non-polluting materials. To make better use of your stove it is advisable to follow the instructions in this booklet. Read this manual carefully before use or any maintenance operation.
• • • • • • Make sure that the stove is transported in compliance with safety regulations. Avoid any improper transfers or knocks that may damage the ceramics or the structure. The metal structure is coated using high temperature paints. When using the appliance for the first few times, unpleasant odours may be given off due to the paint of the metal parts that is drying: this is in no way dangerous and in such case, simply ventilate the premises.
PELLET KITCHEN with OVEN 9 KW Chimney flue draught PELLET STOVES 11 KW 12 Pa Chimney flue draught Fume temperature 111 °C Mass flow of fumes 6,1 PELLET STOVES SLIM 7,5 KW 12 Pa Chimney flue draught Fume temperature 203 °C Fume temperature 184 °C g/s Mass flow of fumes 8,3 g/s Mass flow of fumes 6,22 g/s 11 Pa Chimney flue draught 11 Pa Chimney flue draught Fume temperature 139 °C Fume temperature 181 °C Fume temperature 176 °C Mass flow of fumes 15,3 g/s Mass flow of
Roof pitch α [°] Horizontal width of reflux zone measured from top A axis [m] Minimum height from roof for discharging exhaust fumes H min =Z+0.50m Height of reflux zone Z [m] 15 1.85 1.00 0.50 30 1.50 1.30 0.80 45 1.30 2.00 1.50 60 1.20 2.60 2.10 02.2 DRAUGHT Fumes heat up during combustion, increasing their volume. Their density is therefore lower than the one of the surrounding colder air.
• • • • • • All the structures which could catch fire if exposed to excessive heat must be protected. Floors made from wood or inflammable materials must be protected using non-combustible materials (e.g. 4mm-thick sheet metal or ceramic glass). The appliance installation must ensure easy access for cleaning the stove, exhaust pipes and vent pipe. This appliance is not suitable to be installed on a shared vent pipe. During normal operation, the stove draws air from the room where it is installed.
PELLET STOVES SLIM 4,5 KW PELLET STOVES SLIM 4,5 KW PELLET STOVES SLIM 11 KW PELLET STOVES SLIM 11 KW REAR WALL P = 40 mm REAR WALL P = 40 mm REAR WALL P = 100 mm REAR WALL P = 100 mm SIDE WALL L = 300 mm SIDE WALL L = 200 mm SIDE WALL L = 250 mm SIDE WALL L = 150 mm - mm FLOORING F = - mm FLOORING F = - mm FLOORING F = 1000 mm FRONT R = FLOORING F = FRONT R = 1000 mm FRONT R = 1000 11 KW INSERTS 7,5 KW INSERTS 100 180 REAR LATERAL 100 180 FRONT 1500 1000
04 INSTALLATION Pursuant to current regulations on installation, the stove must be placed in a well-ventilated place to guarantee efficient combustion and proper functioning. The room must have a volume equal to or higher than 20 m3. An air vent is required to guarantee efficient combustion (40 m3/h air).
11 KW INSERTS Ducting system Suitably isolated the beam above the insert if present. Any extraordinary maintenance operations shall be carried out by authorised staff, with the insert switched off, after slightly lifting its front side and pulling it out. The devices which can be equipped with ducting systems are the 11KW inserts, not removed for loading. Pellet feeding: remove the upper drawer and fill it with pellet. This operation can also be performed while the insert is running.
USING THE OVEN The powers are set as follows: P1, P2, P3, P4, P5, OVEN. Using the powers from P1 to P5 the stove works normally, as a classic stove, with predefined caloric power and room ventilation. Pressing the 1 button you can change the Ambient Set. Using the OVEN mode the stove works according to the temperature of the oven. As you can see, inside the oven there is a temperature probe which controls the internal temperature.
THE STOVE DOES NOT WORK IF THE LID OF THE PELLET HOPPER IS OPEN. 04.7 AIR-TIGHT STOVES (Electronics p. 26) IMPORTANT: THE LENGTH OF THE FLUE DUCT MUST BE OF MAX. 6 METERS WITH A DIAMETER OF 80 mm; EVERY 90° CURVE OR (T) CONNECTION IS CONSIDERED AS 1 METER OF PIPE.
Fire on Once fume temperature has reached and exceeded Pr13 parameter value, the stove goes into the switching on mode (ACC). In this phase temperature stabilises for a period of time set by Pr02 parameter. In case the contrary is arrested and the error message (ALAR). Stove operational Once fume temperature has reached and exceeded Pr13 parameter value, maintaining it for the period of time set by Pr02 parameter, the stove enters the normal working mode.
DAY 1 - Monday ON 1 DAY 2 - Tuesday ON 2 DAY 3 - Wednesday ON 3 DAY 4 - Thursday ON 4 DAY 5 - Friday ON 5 DAY 6 - Saturday OFF 6 DAY 7 - Sunday OFF 7 The same applies to UT11 - UT12 - UT13 - UT14 - UT15 - UT16. Example: TIMER PROGRAMMING UT01 --- CURRENT DAY SETTING (DAY 7 = SUNDAY) PROGRAMME1 UT05 --- 1ST SWITCHING ON UT06 --- 1ST SWITCHING OFF TIME UT07 --- DAY CONFIRMATION ( e.g. 07:00am) ( e.g. 09:00am) ( e.g.
BUTTON (P2) - Temperature decrease: When in programming mode, use this button to modify/decrease the selected menu value. When in WORK/OFF, use instead this button to decrease the room thermostat temperature value. BUTTON (P3) - Set/menu: Use this button to access temperature setting and user and technician parameter menu. After entering the menu, use this button to access the next sub-menu or set the value and move to the next menu item when in programming mode.
Stove switching on Hold down P4 for a few seconds to switch on the stove. The display shows the message when the stove is on (START). Start-up phase The stove performs all the steps of the start-up phase according to the parameters concerning its levels and times. Ignition failure The alarm is triggered when, after the period of time set by Pr01, the fume temperature has not reached the minimum value admitted (Pr13 parameter) with a gradient equal to 2°C/min (NO LIGHTIN-).
DESCRIPTION OF PANEL LED (L0) Room temperature setting LED (L1) Heat output setting LED (L2) Chrono LED (L3) ON/OFF LED (L4) Alarm LED (L5) Auger tube/exchanger / ignition plug BUTTON (P1) decrease / menu / room temperature setting BUTTON (P2) increase / stove status/heat output setting BUTTON (P3) ON/OFF exit/confirm DISPLAY (D1) status/heat output/parameter THE MENU Hold P1 button down to access the menu. It includes several items and levels to access settings and control board programming.
In case of ignition failure at the end of this phase, the auger tube switches back and remains on during the period of time set by Pr04 parameter, the exhaust blower speed is set by Pr16 parameter and the ignition plug is still on. Fire on Once fume temperature has reached and exceeded Pr13 parameter value, the stove goes into the ignition mode: the message "FLAME LIGHT" appears on the display and the ON/OFF LED starts flashing.
AL6 NO PELLET - No pellet alarm The alarm is triggered when fume temperature falls below the value set by Pr13 parameter with stove in working mode. The message “AL6 NO PELLET " scrolls on the display and the stove goes into the alarm status. AL7 SAFETY THERMAL - Thermal safety overheating alarm The alarm is triggered whenever the general safety thermostat detects a temperature exceeding the trigger threshold.
Menu M7 – SET TECHNIC This menu item is reserved to the stove installer. After entering the password, P1 (increase) and P2 (decrease) buttons allow all the stove working parameters to be set. USER FUNCTIONS Standard functioning of a control board properly installed on an air stove is described below with reference to the functions available to users. Stove ignition Hold P4 button down for a few seconds to switch on the stove. The display shows the message “START” when the stove is on.
The thermostat switches off the Auger tube, being connected in series to its power supply, the control board reports the alarm status (alarm LED on) by showing the message “AL7 SAFETY THERMAL” on the display and the stove switches off. AL8 FAILURE DEPRESS - No negative pressure alarm The alarm is triggered whenever the external pressure switch detects a pressure higher value below the trigger threshold.
Menu M4 – SELECT LANGUAGE Use this function to select one of the languages available. Menu M5 – SELECT FEELER Use this menu to select the internal or the remote control sensor Menu M6 – MODO STAND-BY If you select the “MODO STAND-BY” mode, the stove switches off after a period of time, set by Pr44, during which the room temperature remained at a value higher than the SET temperature. Only if the following condition occurs - TSET < (Tambiente - Pr43), it is then possible to switch the stove back on.
ALARM ACTIVE NO LIGHTIN- - Ignition failure alarm The alarm is triggered whenever ignition fails. The stove switching-off phase starts immediately. ALARM ACTIVE NO LIGHTIN- - Stove switching-off during working mode alarm The alarm is triggered when, during normal working mode, the flame goes out and the fume temperature falls below the minimum threshold set by Pr13 parameter. The stove switching-off phase starts immediately.
PRE LOADING: (available only when the stove is off). There are two pre-load methods available: NORMAL: hold the P5 key (up) as long as you want the auger tube to work. Press P3 to exit. AUTO: carries out a pre-load at a time set. Press P3 to exit.
• • Mode Ignition 2, the system switches to the next mode when the set temperature is exceeded. If this does not happen within the set time, the system enters the start-up failed alarm condition. After reaching the pre-set fume temperature, the blowers start. Mode Fire on. After correctly completing all these phases, the ignition plug switches off and the system checks whether the flame is stable enough to generate an increase in the fume temperature of at least 1.5° C/min.
the device to work properly). We generally recommend that you place it in the appropriate support when not using it. Emergency switch: In case the remote control does not work, you can turn on and off the stove with the button positioned on the rear of the stove near the power cord. (See image on p. 14 EMERGENCY SWITCH) PANEL DESCRIPTION Button (P1) Programmable thermostat access key. Button (P2) On/off key. Button (P3) Hold the P3 key to view useful information.
To this purpose, you can either opt for the predefined settings or you can make your own ones. You can open the PROGRAMMER SET menu by holding the P1 key. From the programmable thermostat menu you can make all necessary settings for proper system operation. Enabling the programmable thermostat After finding the corresponding menu item, use the P4 (SET) key to open the selection menu. Use the P5 and P6 to enable/disable the option. Press P4 to save and exit.
off. If the power outage takes place when the stove is in ECO STOP mode, the stove will return to this mode regardless of how long the outage period is. In all other cases, the stove switches off after the power supply is restored. The stove can also enter a safety alarm condition. In this case you need to reset the safety thermostat placed on the back of the stove. Insufficient pellet level The stove is equipped with a sensor that controls the level of pellet.
failure to abide by the instructions contained herein. non authorised repair operations or changes. use not compliant with safety rules. installation not compliant with national current regulations and safety rules. insufficient maintenance; the use of spare parts that are not original or which are not specific to the model.
ALAR SOND FUMI FAULTY FUME SENSOR CALL TECHNICAL ASSISTANCE. FUME SENSOR DISCONNTED CALL TECHNICAL ASSISTANCE. FAULTY FUME SENSOR FAULTY CONTROL BOARD FAULTY EXCHANGER BLOWER CALL TECHNICAL ASSISTANCE. CALL TECHNICAL ASSISTANCE. CALL TECHNICAL ASSISTANCE. Al smokeT EXCESSIVE PELLET SET VALUE AT MAXIMUM HEAT OUTPUT CALL TECHNICAL ASSISTANCE. T. elect (°C) THE TEMPERATURE OF THE MOTHERBOARD HAS EXCEEDED 70 ° C LET THE STOVE COOL, AND THEN TURN IT ON AGAIN.
09. WARRANTY CERTIFICATE Warranty The warranty period is two years if the product was purchased by a private customer (Legislative Decree no. 24, February 2 2002) and one year if it was purchased by a company or by a professional (subject to VAT). The tax document referred to the product purchase gives validity to the warranty and the date on it shall be used to calculate the warranty period.
CERTIFICATE OF INSTALLATION AND TESTING CUSTOMER: ____________________________________ Retailer's Stamp: ROAD: _________________________________________ CITY: __________________________________________ POSTAL CODE: _________________________________ Installer's stamp: PROVINCE: _____________________________________ TEL: ___________________________________________ Delivery date: ____________________________________ First name: ___________________________________________ Delivery note: __________________