
Product Information Guide


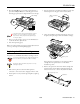


Table Of Contents
- USER REPLACEABLE PARTS
- OPTIONS
- PRINTER SPECIFICATIONS
- CONTROL PANEL BUTTONS AND LIGHTS
- ERROR INDICATORS
- STATUS MONITOR
- PAPER POSITIONS
- AVAILABLE PAPER PATHS
- PAPER RELEASE LEVER POSITIONS
- PAPER THICKNESS LEVER POSITIONS
- PAPER HANDLING
- Loading Multipart Forms
- Loading Continuous Paper with Labels
- Using the Front Push Tractor
- Using the Rear Push Tractor
- Using the Tractor in the Pull Position
- Switching Between Printing on Continuous Paper and Printing on Single Sheets
- Adjusting the Top- of- Form Position
- Advancing the Paper to the Tear-Off Edge
- REPLACING THE RIBBON CARTRIDGE
- CLEARING PAPER JAMS
- YOUR PRINTER'S DEFAULT SETTINGS
- ALIGNING VERTICAL LINES IN YOUR PRINTOUT
- PRINTING A SELF TEST
- PRINTING A HEX DUMP
- CLEANING THE PRINTER
- TRANSPORTING THE PRINTER
- RELATED DOCUMENTATION

EPSON FX-980
4/99 EPSON FX-980
- 23
4. Press the LF/FF
D button to feed the paper backward, or
press the
Load/Eject
U button to feed the paper forward
until the paper perforation is aligned with the tear-off edge.
The printer has a minimum and maximum tear-off
position. If you try to adjust the tear-off position
beyond these limits, the printer beeps and stops
moving the paper.
5. After you set the tear-off position, press the Pause button
to turn off the micro adjust mode.
6. Tear off the printed page(s).
When you resume printing, the paper automatically feeds back
to the top-of-form position and printing begins.
Replacing the Ribbon Cartridge
Your printer uses an EPSON black ribbon cartridge S015091.
If you just used the printer, the print head may be hot;
let it cool before you replace the ribbon cartridge.
Moving the print head while the printer is on may
damage the printer.
1. Make sure the printer is turned off. If the printer is
connected to an electrical outlet, unplug it from the outlet.
2. Lift the printer cover by its back edge and pull it straight up
and off.
3. Slide the print head to the ribbon installation position (the
indented portion of the paper tension unit) by hand.
4. Grasp the used ribbon cartridge and pull it up and out of
the printer. Properly dispose of the used ribbon cartridge.
If the pull tractor is installed, you can replace the ribbon
cartridge when the print head is not in the ribbon
installation position.
5. Remove the separator from the new ribbon cartridge and
discard it. Then turn the ribbon tightening knob in the
direction of the arrow to remove any slack in the ribbon.
tear-off edge
ribbon installation
position
ribbon guide
ribbon tightening knob
separator