
User's Manual


Chapter
4
Installing Option Cards
Option cards are accessories you can install in your Equity III+ to pro-
vide extra capabilities. For example, you can add another disk drive or
expand the computer’s internal memory up to 15.5MB.
The Equity III+ has nine option card slots, so it can hold up to nine
cards. A hard disk controller card occupies one slot (whether or not your
system has a hard disk) and the parallel and serial interface and floppy disk
controller card occupies another. The card (or cards) that controls your
monitor occupies an additional slot (or slots).
You can buy option cards from Epson as well as other vendors. Multi-
function cards that allow you to add features without using multiple option
card slots are also available. Consult your dealer for more information.
This chapter describes how to remove and replace the main unit’s cover,
and install and remove an option card.
Removing the Cover
To install an option card, you need to remove the cover from your
Equity III+.
WARNING: Never open the cover of the Equity III+ while it is plugged
into an electrical outlet. Before you open the cover, turn
off the power switches on the main unit and each periph-
eral, let the computer stand for a few minutes, and then
unplug the power cable.
1.
If the computer is locked, unlock it (with the key lock). Otherwise, you
cannot take the cover off your system.
2.
If the monitor is on top of the computer, lift it off and set it to one side.
Turn the main unit around so the back panel faces you.
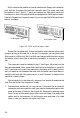
3.
As shown in Figure 4-1, the top cover is secured by four screws on the
back panel. Remove the screws and put them all safely to one side. They
are small so be careful when you take them out.
4-1