
Installation


PAGE 8
4400DBFR_FTN_A LK4400DBFR_FTN_A
1000003955 (Rev. A - 06/17)
Insufcient Bubbler Flow: Check that the shut-off valve is wide open. Verify minimum 20 PSI supply pressure. Clean inlet strainer screen located in the valve
body.Cleanrubberoriceinowcontrollocatedbelowfrostlineinbushingbetweenbarbttingandvalve.
No Flow: Check for leaks in the air tubing going from the push button to the valve. Make sure the air tubing compression nut is hand tight. Disconnect air tube from
pushbutton.Placengeroverairoutlet.Pushbuttontotestdiaphragm.Tightendiaphragmcapscrews.Replacediaphragmifnecessary.
Continued Insufcient or Varied Height of Bubbler Flow:
• Check for kinks in the tubing.
• Remove the valve assembly from the PVC column by carefully pulling up on the strap and connecting tubing at the same time. Check stream height from the bubbler.
Stream height is factory set at 35 PSI. If supply pressure varies greatly from this, adjust the screw on the regulator (Item 13, Fig. 4, Page 6). Clockwise adjustment
will raise stream and counter-clockwise adjustment will lower stream. For best adjustment stream height should be approx. 1-1/2" (38mm) above the bubbler guard.
Replace the valve into the PVC column. Make sure the supply hose coils into the bottom of the PVC column without any kinks and double check that the valve is
positioned fully at the bottom of the PVC column.
Continuous Bubbler Flow: Insure that push button is not obstructed and springs back to normal position. Remove four screws which secure plastic diaphragm block
to valve body. Pull plastic and rubber diaphragm assembly out of valve body. Locate tiny hole in rubber diaphragm just under lip of plastic part. Clean debris from this
hole.Inspectvalveseatforgrooves.IfvalveseatwasOKanddiaphragmholewasfreefromdebris,inspectrubberbuttonlocatedatcenterofoatingsteeldiscinvalve
diaphragm block assembly. If button is worn, turn disc over or replace it. If diaphragm and seats are in good condition, stretch spring slightly. Spring is located behind
oatingstainlesssteelplate.Insurethatairbleedportonvalveplasticblockassemblyisnotplugged.
TROUBLESHOOTING AND MAINTENANCE
ITEM
NO.
PART NO.
98683C
97446C
0000000325
45926C
66346C
28467C
98684C
1000003812*
101570540560
97247C
45476C
98901C
28703C
28703C-LK
28091C-HT
45726C
0000000466
75565C
56092C
56123C
75565C
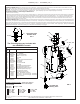
PARTS LIST
20
21
22
23
24
25
26
27
28
29
30
31
32
32a
32b
33
34
NS
NS
NS
NS
DESCRIPTION
Kit - Drain Adapter/Gasket/Nut/Washer
Kit - VR Bubbler
Kit - Drain Plug/Gasket
Tailpipe 1-1/4" x 27-1/2"
Drain Tube
Basin
Kit - Drain Elbow/Gasket/Nut/Washer
Access Panel
Drain Gasket
Kit - Torx Screws/Bit
Drain Tube
Kit - FR Push Button/Sleeve/Nuts
Blank Nameplate Insert (only)
LK4420FR Nameplate Insert (only)
4420FR Nameplate Insert (only)
Drain Plug (Pet Fountain)
Kit - Bubbler (Pet Fountain)
Fitting - Double Male Connector
Poly Tubing - 1/4" (Cut To Length) - To Bubbler
Poly Tubing - 1/8" (Cut To Length) - To Actuator
Fitting 1/8" Union
The Following Items are included with
the 4420DBFR Fountain
FIG. 8
21
24
27
30
22
25
20
22
PRINTED IN U.S.A.
Halsey Taylor – halseytaylor.com
Elkay – elkay.com
FOR PARTS CONTACT YOUR LOCAL DISTRIBUTOR OR CALL TECHNICAL SERVICES AT 1.800.834.4816
2222 CAMDEN COURT, OAK BROOK, ILLINOIS 60523
*select color option to complete part number
NS = Not Shown
*FINISH COLOR OPTIONS – Choose color option to
complete your model number, add as sufx example:
4400DBFRKEVG
Mattenish:Evergreen=EVG
Glossnish:
Beige = BGE Gray = GRY Terracotta = TER
Black = BLK Orange = ORN White = WHT
Blue = BLU Purple = PUR Yellow = YLW
Brown = BRN Red = RED
Vandal-Resistant
Bubbler Detail
FIG. 7
BASIN
21
32, 32a, 32b
26
Included with
Sanitary Valve
29
34
33
28
31
31
23
25