
User Guide


Rev.1/15/2016 5 www.elitescreens.com
Screen operation
Electric Current: Depending upon region, your Elite Screen will operate on 100v, 110v, or 220v voltage.
1. After ensuring the power outlet & screen are compatible (voltage), plug the power cord into the power outlet.
2. Once the screen’s has power, you’ll be able to control it using any of the 6 methods described below.
6 ways to control your Saker
5. 5-12 volt trigger (Item D, Fig 4): The built-in 5-
12V trigger input allows your screen to synchronize
its drop & rise with the projector’s power cycle.
The screen deploys when the projector powers up
and will retract when the projector powers down.
The 5-12 volt RJ45 cable connects to your
projector’s trigger output via a separate cable that
may or may not be provided by the manufacturer of
the projector. The trigger feature will not work
without an output cable from the projector, but it
can be tested by connecting the Red (+) and Green
(-) cable to a 9-volt battery.
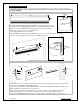
1. IR remote control (Item A, Fig 1): The Infrared functions by direct line
of sight contact with a beam range of 30 feet. Aim the IR remote at the
circular window located on the left side of the screen.
2. IR “Eye” Receiver (Item E, Fig 2): The IR “Eye” Receiver plugs
directly into the screen’s RJ-45 input to present a low profile line-of-sight
control option for your IR remote control even in a recessed ceiling
installation.
3. RF Remote Control (Item B): The radio waves eliminate the need for a
direct line of sight with a range of 100 feet.
Fig.2
Fig.3
UP
STOP
DOWN
IR “eye” receiver
3 Way Wall Switch
(does not have IR sensor)
Fig.1
IR/RF remote
Fig.4
3 prong power cord
RJ45 Input
5-12 volt trigger cable
4. 3-Way Wall Switch (Item C, Fig 3): The 3-way wall switch
is a wall mount control box with an up/stop/down button and
plugs directly into the screen’s RJ-45 input.