
User manual


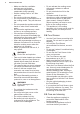


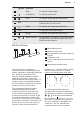

Table Of Contents
- CONTENTS
- 1. SAFETY INFORMATION
- 2. SAFETY INSTRUCTIONS
- 3. INSTALLATION
- 4. PRODUCT DESCRIPTION
- 5. BEFORE FIRST USE
- 6. DAILY USE
- 6.1 Activating and deactivating
- 6.2 Automatic Switch Off
- 6.3 Using the cooking zones
- 6.4 Heat setting
- 6.5 Bridge function
- 6.6 PowerBoost
- 6.7 Power Management
- 6.8 Assisted Cooking
- 6.9 Sous Vide
- 6.10 Thermometer
- 6.11 Melting
- 6.12 Pause
- 6.13 Timer
- 6.14 Lock
- 6.15 Child Lock
- 6.16 Language
- 6.17 Key Tones / Buzzer Volume
- 6.18 Display Brightness
- 6.19 Hob²Hood
- 7. HINTS AND TIPS
- 8. CARE AND CLEANING
- 9. TROUBLESHOOTING
- 10. TECHNICAL DATA
- 11. ENERGY EFFICIENCY

Symbol Comment
7
- Slider To adjust the heat setting.
8
PowerBoost To activate the function.
9
Lock To activate and deactivate the function.
10
- The window of the Hob²Hood infrared signal
communicator. Do not cover it.
11
Pause To activate and deactivate the function.
12
0 - 9 - To show the current heat setting.
13
Bridge To activate and deactivate the function.
14
/
Signal indicators Full connection / No signal. To show the signal
strength of the connection between the Food
Sensor and the antenna.
4.3 Food Sensor
2 4 5 61 3
1
Measurement point
2
Minimum level mark
3
Recommended immersion range (for
liquids)
4
Calibration code
5
Hook for placing the Food Sensor on
the rim
6
Handle with antenna inside
The Food Sensor is a wireless
temperature probe operating without a
battery, delivered in a packaging with the
hob. Inside its handle there is an
antenna. Another antenna is located
below the hob surface, in the area
between the two rear cooking zones. To
ensure proper communication between
the Food Sensor and the hob do not put
anything on the hob in this area.
The measurement point is located
halfway between the tip and the
minimum level mark. Insert the Food
Sensor in the food at least up to the
minimum level mark. For liquids, to get
the best cooking results, immerse the
Food Sensor in the liquid 2-5 cm above
the minimum level mark. Place the Food
Sensor on the rim of the pot or pan by
the hook; close to the area with the
antenna, at 1 - 3 o'clock position (for the
left side of the hob) or 9 - 11 o'clock
position (for the right side of the hob).
The following indicators show the
strength of the connection between the
hob and the Food Sensor on the display:
, , . If the hob cannot establish
the connection, comes on. You can
move the Food Sensor along the rim of
the pot to establish or strengthen the
connection. The hob refreshes the
connection status every 3 seconds.
ENGLISH 9