user manual Washing Machine RWP 86109 W RWP 106109 W RWP 126109 W
electrolux Electrolux. Thinking of you. Share more of our thinking at www.electrolux.com SAFETY INFORMATION Important! Read carefully and keep for future reference. • The safety of your appliance complies with the industry standards and with legal requirements on the safety of appliances. However, as manufacturers, we feel it is our duty to provide the following safety notes. • It is most important that this instruction book should be retained with the appliance for future reference.
electrolux 3 • Any electrical work required to install this appliance should be carried out by a qualified electrician or competent person. Use • This appliance is designed for domestic use. It must not be used for purposes other than those for which it was designed. • Only wash fabrics which are designed to be machine washed. Follow the instructions on each garment label. • Do not overload the appliance. See the "Washing Programme Chart".
electrolux hoses in the bowl placed on the floor and let water drain out completely; 7. screw the water inlet hose back on and reposition drain hose again; When you intend to start the appliance up again, make sure that the room temperature is above 0°C. ENVIRONMENT CONCERNS The symbol on the product or on its packaging indicates that this product may not be treated as household waste.
electrolux 5 7 Water drain hose 8 Drain hose support 9 Hose holders 10 Water inlet hose 11 Mains cable 12 Back feet TECHNICAL DATA Dimensions Width Height Depth Depth (Overall dimensions) 60 cm 85 cm 50 cm 55 cm Electrical connection Voltage - Overall power - Fuse Information on the electrical connection is given on the rating plate, on the inner edge of the appliance door.
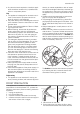
electrolux • Remove the polystyrene base from the bottom. 1 2 • Remove the power supply cable and the draining and inlet hose from the hose holders ( C ) on the rear of the appliance. • Return appliance to the upright position. • Unscrew the three bolts ( A ) and remove the hose holders ( C ). • Slide out the relevant plastic spacers ( B ). • Open the door and remove the plastic hose guide, the bag containing the instruction booklet and the plastic plug caps from the drum.
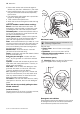
electrolux 7 Water inlet • Connect the hose to a tap with a 3/4” thread. Positioning and levelling Level the appliance by raising or lowering the feet. Depending on the model, the appliance can have four adjustable feet, or two front-adjustable feet and two back fixed feet. The appliance MUST be level and stable on a flat hard floor. If necessary, check the setting with a spirit level. Any necessary adjustment can be made with a spanner.
electrolux The end of the drain hose can be positioned in three ways: • Hooked over the edge of a sink using the plastic hose guide. drain hose to prevent waste from the sink entering the appliance. If the outlet spigot has not been used before, remove any blanking plug that may be in place. • Directly into a drain pipe at a height of not less than 60 cm and not more than 100 cm. The end of the drain hose must always be ventilated , i.e.
electrolux 9 Connections overview 115 cm 100 cm Electrical connection • The appliance must be earthed. • Make sure that the electrical information on the rating plate agree with your domestic power supply. • Always use a correctly installed shockproof socket. • Do not use multi-way plugs, connectors and extension cables. There is a risk of fire. • Do not replace or modify the mains cable yourself. Contact the After Sales Service. 150 cm max 100 cm 90 cm min. 60 cm min.
electrolux • Never wash whites and coloureds together. Whites may lose their «whiteness» in the wash. • New coloured items may run in the first wash; they should therefore be washed separately the first time. • Rub particularly soiled areas with a special detergent or detergent paste. • Treat curtains with special care. • Wash the socks and the gloves inside the bag or a net. Remove stubborn stains before washing: Blood : treat fresh stains with cold water.
electrolux 11 Although biodegradable, detergents contain substances which, in large quantities, can upset the delicate balance of nature. The choice of detergent will depend on the type of fabric (delicates, woollens, cottons, etc.), the colour, washing temperature and degree of soiling.
PU SH RE TO MOV CL E EA N 12 electrolux If the flap is not in the desired position : • Remove the drawer. Push the drawer edge outwards where indicated by the arrow (PUSH) to facilitate drawer removal. The flap is down and you wish to use powder detergent: • Measure out the detergent. • Pour the powder detergent into the main wash compartment . The flap is up and you wish to use liquid detergent: • Rotate the flap downwards. • Carefully put the drawer back. • Rotate the flap upwards.
electrolux 13 For the quantity of detergent, refer always to what is written on the product packing and ensure that the detergent can be poured in the drawer. • Pour the liquid detergent in the compartment without exceeding the limit indicated in the flap. The detergent must be placed in the appropriate compartments of the dispenser drawer before starting the wash programme. Warning! Do not use the flap in "DOWN" position with: • Gelatinous detergent or thick detergent. • Powder detergent.
electrolux Turn the programme selector dial to the required programme. The selector dial can be turned either clockwise or counter-clockwise. The green pilot light of the button 6 starts flashing: the appliance is now switched on. Programme selector dial Speciali Scuri Cotoni Cotoni Mini program 1 + Prelav.
electrolux 15 Delay 3h 6h 9h 5 The start of the programme can be delayed by 9, 6 or 3 hours by means of this button. The relevant light illuminates. You must select this option after you have set the programme and before you start the programme. Select a delayed start: • select the programme and the required options; • select the delay start by pressing the button 5 ; • press the button 6 : – the appliance starts its hourly countdown. – The programme will start after the selected delay has expired.
electrolux At the end of the programme The appliance stops automatically. The pilot light of the button 6 and the pilot light corresponding to the just finished washing phase go off. The light 7.3 illuminates. If a programme or an option that ends with water left in the tub has been selected and the door remains locked to indicate that the water must be emptied out before opening the door. Follow the below instructions to empty out the water: • Turn the programme selector dial to .
electrolux 17 Programme - Maximum and Minimum Temperature - Cycle Description - Maximum Spin Speed - Maximum Fabrics Load - Type of Laundry Options - ECO 60° - 40° Main wash - Rinses - Maximum spin speed: 800 rpm for RWP86109W, 1000 rpm for RWP106109W, 1200 rpm for RWP126109W Max. load 6 kg White and coloured cotton . This programme can be selected for slightly or normally soiled cotton items. The temperature will decrease and the washing time will be extended.
electrolux Programme - Maximum and Minimum Temperature - Cycle Description - Maximum Spin Speed - Maximum Fabrics Load - Type of Laundry - RISCIACQUO Rinse - Short spin speed 700 rpm. If a spin speed higher than 700 rpm is selected, by pressing the relevant button, the appliance performs a long spin. (Maximum spin speed: 800 rpm for RWP86109W, 1000 rpm for RWP106109W, 1200 rpm for RWP126109W) Max. load 6 kg To rinse and spin cotton garments which have been washed by hand.
electrolux 19 Programme - Maximum and Minimum Temperature - Cycle Description - Maximum Spin Speed - Maximum Fabrics Load - Type of Laundry - SCURI 60°(Cold) Main wash - Rinses - Maximum spin speed: 800 rpm for RWP86109W, 1000 rpm for RWP106109W, 1200 rpm for RWP126109W Max. load 3 kg Trousers, shirts or jackets in denim and jersey realized with hi-tech materials. The Extra Rinse option is activated automatically.
electrolux • Use a stiff brush to clean and remove all washing powder residue. After having cleaned the dispenser and the drawer recess, replace it. Cleaning the drain filter The filter permits to hold fluff or foreign bodies left unawares in the laundry. The pump must be cleaned regularly. To clean the filter, proceed as follows: • Tturn programme selector dial to position . • Unplug the appliance.; • Open the door. • Turn the drum and align the filter cover ( FILTER ) with the arrow on the door seal.
electrolux 21 Warning! Keep the filter cover open until the filter removal. • If necessary, place the filter cover in the right position again. • Open the filter cover and insert the filter again. • Before removing the filter, remove any fluff or small objects from around the filter. • The filter is inserted correctly when the indicator on its top is visible and blocked. • Remove the filter and clean it under the tap. • Close the filter cover. • Insert the mains plug again.
electrolux • Screw the hose back onto the tap. Make sure the connection is tight. • Unscrew the hose from the appliance. Keep a towel nearby because some water may flow. • Clean the filter in the valve with a stiff brush or with the piece of cloth. Cleaning the water inlet filters Important! If the appliance doesn't fill, it takes a long time to fill with water, the starting button flashes red or the display (if available) shows the relevant alarm (see chapter "What to do if...
electrolux 23 Fault code and malfunction Lavaggio Extra Risciacquo Fine ciclo Avvio/Pausa Possible cause / Solution The water tap is closed. • Open the water tap. The inlet hose is squashed or kinked. • Check the inlet hose connection. The filter in the inlet hose or the inlet valve filter are blocked. • Clean the water inlet filters (read "Cleaning the water inlet filters" for more details). The light of button 6 flashes and the light 7.
electrolux Malfunction The appliance does not start: The appliance fills then empties immediately: Possible cause / Solution The plug is not properly inserted in the power socket. • Insert the plug into the power socket. There is no power at the socket. • Please check your domestic electrical installation. The main fuse has blown. • Replace the fuse. The programme selector dial is not correctly positioned and the button 6 has not been pressed.
electrolux 25 Malfunction Possible cause / Solution Unsatisfactory washing results Too little detergent or unsuitable detergent has been used. • Increase the detergent quantity or use another one. Stubborn stains have not been treated prior to washing. • Use commercial products to treat the stubborn stains. The correct temperature was not selected. • Check if you have selected the correct temperature. Excessive laundry load. • Reduce the laundry load.
electrolux
electrolux 27
www.electrolux.