SMALL DRUM PENDANT MODEL #83569 Français p. 10 ATTACH YOUR RECEIPT HERE Serial Number Purchase Date Questions, problems, missing parts? Before returning to your retailer, call our customer service department at 1-855-226-7169, 8 a.m. - 4 p.m., EST, Monday - Friday.
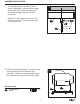
PACKAGE CONTENTS A B C D L K F E G J H I PART A B C D E F DESCRIPTION 7-Bead Crystal String 8-Bead Crystal String 10-Bead Crystal String 11-Bead Crystal String Cord Set Screw QTY 3 3 3 3 1 1 PART G H I J K L 2 DESCRIPTION Mounting Surface 40-Watt G9 Bulb Bulb Cover Socket Canopy Mounting Bracket QTY 1 1 1 1 1 1
HARDWARE CONTENTS AA Wire Connector Qty: 3 BB Short Machine Screw Qty: 2 CC Canopy Screw Qty: 2 SAFETY INFORMATION Please read and understand this entire manual before attempting to assemble, operate or install the product. • • • • • WARNING IMPORTANT: NEVER attempt any work without shutting off the electricity. Go to the main fuse box, or circuit breaker, in your home.
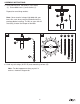
ASSEMBLY INSTRUCTIONS 1. The hanging length of the cord (E) for this fixture is adjustable. Hold the fixture canopy (K) up against the ceiling to determine the desired length before the entire fixture is assembled. 1 Cord (E) is held in place by a setscrew (F). Loosen the setscrew (F) to release the cord (K) for adjustment. K F Screwdriver (Included) E 2. Orient the mounting bracket (L) so that the arms are facing away from the outlet box (not included).
ASSEMBLY INSTRUCTIONS 3. Wire connection guide: Ground wire: • For installation in the United States: Wrap ground wire from outlet box around ground screw on mounting bracket (N) no less than 2 in. from wire end. Tighten ground screw. If fixture is supplied with a ground wire, connect to outlet ground wire with a wire connector (AA). • For installation in Canada: If fixture is supplied with ground wire, wrap ground wire around ground screw on mounting bracket (B). Tighten ground screw.
ASSEMBLY INSTRUCTIONS 5. Insert 40-watt max. G9 bulb (H) into socket (J). Screw bulb cover (I) onto socket (J). 5 Repeat for remaining sockets. J Note: Never touch a halogen light bulb with your bare skin, even when removing the bulb from the package before installing. The oils on your skin will drastically shorten the lifespan of the bulb. H I 6a 6b A G A G 6. Hook crystal strings (A-B-C-D) onto moutning surface (G). Note: For best appearance hang crystals in order as shown on diagram 6b.
CARE AND MAINTENANCE • Always be certain that electric current is turned off before cleaning this item. • Use a soft, moist cloth with mild non-abrasive soap to clean fixture. Never use glass cleaner on fixture, as it will damage the metal finish. • All glass shades may be washed in a towel-lined sink with warm water and mild soap. Do not wash shades in an automatic dishwasher. TROUBLESHOOTING PROBLEM Fixture does not light. POSSIBLE CAUSE CORRECTIVE ACTION 1. Fixture may be wired incorrectly. 1.
WARRANTY This warranty does not apply to any products that have been subjected to misuse, mishandling, misapplication, connected to voltage at more than 5% above standard North American voltage, unusual use (including but not limited to use in an environment where the annual average ambient operating temperature is below 27 or above 95 degrees Fahrenheit), neglect (including but not limited to improper maintenance), accident, acts of god such as high winds, improper installation or care, failure to follow t
REPLACEMENT PARTS LIST For replacement parts, call our customer service department at 1-855-226-7169, 8 a.m. - 4 p.m., EST, Monday - Friday. PART A B C D I L AA BB CC A DESCRIPTION 7-Bead Crystal String 8-Bead Crystal String 10-Bead Crystal String 11-Bead Crystal String Bulb Cover Mounting Bracket Wire Connector Short Machine Screw Canopy Screw B C D I PART # 7BCS83568 8BCS83568 10BCS83568 11BCS83568 BC001 XBAR83569 WC001 SCR832X050 CS83568 L AA BB CC Printed in China Rev.
PETIT LUMINAIRE SUSPENDU TAMBOUR MODÈLE #83569 JOIGNEZ VOTRE REÇU ICI Numéro de série Date d’achat Des questions, des problèmes, des pièces manquantes? Avant de retourner l’article au détaillant, appelez notre service à la clientèle au 1 855 226-7169, entre 8 h et 16 h (HNE), du lundi au vendredi.
CONTENU DE L’EMBALLAGE A B C D L K F E G J H I PIÈCE A B C D E F DESCRIPTION Guirlande de cristaux à 7 perles Guirlande de cristaux à 8 perles Guirlande de cristaux à 10 perles Guirlande de cristaux à 11 perles Cordon Vis de réglage QTÈ 3 3 3 3 1 1 PIÈCE G H I J K L 11 DESCRIPTION Surface de montage Ampoule G9 40 watts Cache-ampoule Douille Pavillon Support de fixation QTÈ 1 1 1 1 1 1
QUINCAILLERIE INCLUSE AA BB Capuchon de connexion Vis à Qté : 3 métaux courtes Qté : 2 CC Vis du pavillon Qté : 2 CONSIGNES DE SÉCURITÉ Veuillez vous assurer de lire et de comprendre l’intégralité du présent guide avant d’assembler, d’utiliser ou d’installer ce produit. • • • • • AVERTISSEMENT IMPORTANT : NE tentez JAMAIS de travailler sans couper l'électricité.
INSTRUCTIONS POUR L'ASSEMBLAGE 1. La longueur du cordon de suspension (E) de ce luminaire est réglable. Maintenez le pavillon (K) du luminaire contre le plafond pour déterminer la longueur désirée avant l'assemblage complet du luminaire. 1 Le cordon (E) est maintenu en place par une vis de réglage (F). Desserrez la vis de réglage (F) pour libérer le cordon (E) et permettre le réglage. K F Tournevis (fourni) E 2.
INSTRUCTIONS POUR L'ASSEMBLAGE 3. Guide de raccordement électrique 3 Fil de mise à la terre : • Pour une installation aux États-Unis : enroulez le fil de mise à la terre provenant de la boîte de sortie autour de la vis de mise à la terre située sur le support de fixation (L), à au moins 5,08 cm de l’extrémité du fil. Serrez la vis de mise à la terre.
INSTRUCTIONS POUR L'ASSEMBLAGE 5. Insérez quatre ampoules G9 de 40 watts (H) dans les douilles (J). Vissez les cache-ampoules (I) sur les douilles (J). 5 Répétez l'opération pour les douilles restantes. J Remarque: Ne touchez jamais une ampoulehalogène avec votre peau nue, même lorsque vous retirez l’ampoule de son emballage avant de l’installer. Les huiles que contient votre peau raccourciraient considérablement la durée de vie de l’ampoule. 6a H I 6b A G A G 6.
ENTRETIEN • Vérifiez toujours que le courant est coupé avant de nettoyer le luminaire. • Utilisez un linge doux et humide ainsi qu’un savon non abrasif. N’utilisez jamais de nettoyants pour vitres; vous risqueriez d’endommager le fini métallique du luminaire. • Les abat-jour en verre peuvent être nettoyés dans un évier couvert de serviettes, à l’aide d’eau tiède et de savon doux. Ne nettoyez pas les abat-jour dans un lave-vaisselle. DÉPANNAGE PROBLÈME Le luminaire ne s’allume pas. CAUSE POSSIBLE 1.
GARANTIE Cette garantie ne s'applique pas aux produits qui ont été soumis à un usage abusif, une manipulation inadéquate, un usage impropre, qui ont été connectés à un voltage de plus de 5 % supérieur au voltage nord américain, qui ont subi un usage inhabituel (y compris mais sans s'y limiter un usage dans un environnement où la température ambiante moyenne annuelle est inférieure à 27 °F [-2,8 °C] ou supérieure à 95 °F [35 °C]), la négligence (y compris mais sans s'y limiter un mauvais entretien), un accid
LISTE DES PIÈCES DE RECHANGE Pour obtenir des pièces de rechange, appelez notre service à la clientèle au 1 855 226-7169, entre 8 h et 16 h (HNE), du lundi au vendredi.