
RealFlight 9.5S Flight Simulator User Manual with Interlink Steam Controller version -RFL1200S


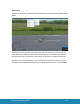


Table Of Contents
- Welcome to the RealFlight 9.5 RC Flight Simulator
- RealFlight 9.5 Feature Highlights
- How to read this manual
- System Requirements
- Video and Sound Cards
- Getting the Most out of RealFlight
- Installing RealFlight 9.5 RC Flight Simulator
- Program Installation (DVD)-
- Program Installation (Digital Download)-
- Program Installation (Steam®)-
- Using Your Own RC Radio
- Exploring RealFlight 9.5
- Keyboard Commands
- Where to Go From Here
- Fly with the InterLink DX, your Spektrum DSM2/DSMX transmitter, or with your own radio.
- Wireless Simulator Dongle
- Features of the InterLink DX Controller-
- Features of the Spektrum WS2000 Wireless Simulator Dongle-
- Features of the RealFlight wireless SLT interface-
- Features of the RealFlight wired interface-
- Start Flying!
- Select Scenario…
- Manage Scenarios…
- Select Controller…
- Physics…
- Graphics…
- Flight Failures
- Setup Failures
- Import
- Export
- Manage User Files
- Mute/Unmute Audio
- Settings
- Audio-
- Camera-
- Challenges-
- Console-
- Graphics-
- Quality-
- Clouds-
- Particles-
- Scenery Objects-
- Shadows Enabled-
- Soft Shadows Enabled-
- Terrain Detail-
- Trees-
- Wind Field Indicators-
- Post-processing: Bloom-
- Post-processing: Night Flying Glow-
- Post-processing: Depth of Field-
- Foliage Density (%)-
- Normal Maps-
- Water Quality-
- Water Particle Quality-
- Water Shadow Quality-
- Shadow Quality-
- Shadow Map Quality-
- Particle Quality-
- Screenshot Quality-
- Streamer Quality-
- Texture Quality-
- Misc. Graphics Quality-
- Hardware-
- Graphics Adapter-
- Graphics Device-
- Full Screen-
- Resolution-
- Refresh Rate-
- Vertical Sync-
- Heads-Up Display-
- Language-
- Multiplayer-
- Physics-
- Rewind -
- Safety Alerts -
- Virtual Reality -
- Wind -
- Capture Screenshot
- Show Title Bar
- Exit
- Aircraft Selection…
- Edit Current Aircraft
- Aircraft Editor Menus-
- File Menu-
- Open…-
- Save-
- Save As…-
- Revert-
- Exit to Simulator-
- Edit Menu-
- Undo-
- Redo-
- Rescale Physics to-
- Component Menu-
- Cut-
- Copy-
- Paste-
- Add-
- Delete-
- Rename-
- Options Menu-
- Play Engine Sounds-
- Control Surface Deflections-
- Units-
- Reload Color Scheme-
- Fuel Level-
- View Menu-
- Look At-
- Look From-
- Background-
- Component Indicators-
- Select Layout-
- Parts Tree-
- Preview Screen-
- Parameter Window-
- Adding and Removing Components-
- More Information-
- Aircraft Editor Menus-
- Quick Edit…
- Select Color Scheme
- Save Color Scheme As…
- Randomize Color Schemes
- Remember Aircraft Position
- Clear Aircraft Position
- Reset Position
- Kill Engine
- Aircraft MRU
- Select Airport…
- Edit Current Airport…
- Airport Editor Menus-
- File Menu-
- Open-
- Save-
- Save As-
- Save folder-
- Load Folder-
- Exit to Simulator-
- Edit Menu-
- Undo-
- Redo-
- Cut-
- Copy-
- Paste-
- Delete-
- Select All-
- Deselect-
- Previous Object-
- Next Object-
- Select Parent-
- Select Child-
- Set As Default Pilot Spawn-
- View menu-
- Mode-
- Fly Camera-
- Pan Camera-
- Pivot Camera-
- Normal Camera-
- Center View on Selection-
- Fit Selection in View-
- Zoom In-
- Zoom Out-
- Zoom Reset-
- Options Menu-
- Selectable Items-
- Add Object Grouping-
- Product, Type, Name-
- Type, Name-
- Name-
- Rotation Snap-
- None
- 45 Degrees
- 15 Degrees
- 5 Degrees
- Display Metric Units-
- Window Menu-
- Folder Listing-
- Object Palette-
- Pilot Preview-
- Properties-
- Reset Window Positions-
- Airport Editor Menus-
- Utilizing the Editor
- Create New Airport
- Sun-
- Thermals-
- Wind-
- Reset to Default
- Airport MRU
- Air Race
- Balloon Burst
- FPV Drone Racing / FPV Racing League
- Grapple
- Hangar Obstacle Course
- Limbo
- Quadcopter Trials
- Ring Race
- Scavenger Hunt
- Spot Landing
- Locked Challenges
- During Flight
- Pre-Flight Information
- Resume Existing Challenge…
- Flight Modes
- NavGuides
- Radio
- Binocular
- Viewport
- Variometer
- Multiplayer
- Overhead
- Timer
- Heads-Up Display
- Quick Load…
- Close All
- Edit NavGuides…
- Pilot Profile
- Join
- Host
- Disconnect…
- Host Options
- Scoreboard
- Server Details…
- Game Help…
- Game Gadgets
- Select Target
- Simulation Sounds
- Voice Chat
- Text Chat
- Enter MultiMode
- Start Recording
- Stop Recording
- Open Recording…
- Record Microphone Input
- Recordings MRU
- Flight Training
- Heli Hover Trainer
- Heli Autorotation Trainer
- Heli Orientation Trainer
- Airplane Hover Trainer
- Scenery
- Effects
- Camera Type
- Camera Position
- Look At
- Zoom Type
- Zoom In
- Zoom Out
- Zoom Reset
- Head Tracking
- RealFlight Help
- Radio Interface Help
- Spektrum WS1000/WS2000 Dongle Help
- Keyboard Commands
- Welcome Screen
- Video Player
- Reset to Defaults
- Technical Support
- Websites
- License
- About
- InterLink DX Layout-
- Airplane Basics
- Helicopter Basics
- Helicopter Flight
- Run RealFlight
- How to Get Help and Information
- Before You Do Anything Else
- If You Need Additional Assistance
- Examples of Common Problems and Solutions

303
RealFlight 9.5 RC Flight Simulator
Trails-
Trails, as the name implies, will create a trail or pathway through the sky depicting all facets
of flight for the aircraft. This feature is very useful for F3A pattern pilots and FAI heli pilots as
well as those modelers wanting to see how precise their maneuvers truly are.
Think you’re a precision pilot? You might be able to fool the judges at a contest, but you can’t
change reality in RealFlight. With RealFlight’s Trails feature, the pathway initiates from the
wingtips of an airplane model and from the main rotorblades of a helicopter and remains in
the sky for the duration of the flight, allowing modelers to thoroughly review their trail from
start to finish. If you stray even a fraction from straight-and-level, or your loops aren’t exactly
round, the evidence is onscreen.
You will also find this feature very useful when used in combination with the Sky Grid feature
mentioned above.
To enable Trails, click the View menu title, then the Effects sub-menu. Then, click the Trails
menu item.
Rotary Trails-
Rotary Trails function similarly to the Trails feature, except it highlights the path of the prop
of the airplane or main rotor of the heli; additionally, the rotary trails do not remain onscreen
throughout the flight.
To enable Rotary Trails, click the View menu title, followed by the Effects sub-menu. Then,
click the Rotary Trails menu item.
Wind Field Indicators-
Flying at sites designed for practicing thermal and slope soaring flight, Wind Field Indicators
will display where the updrafts are located and their direction. To practice real-world
scenarios, you may wish to turn off these indicators.
To enable Wind Field Indicators, click the View menu title, followed by the Effects sub-menu.
Then, click the Wind Field Indicators menu item.