
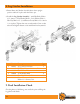
Replacement Part List


26
Operating Instructions
NOTE: For operation in wooded areas, obtain a spark arrestor
for the exhaust system. See the engine operating and maintenance
manual and check with your authorized service center. See also
Fire Prevention on page 5 of this manual.
IMPORTANT: To extend the life of the hydraulic cylinder
avoid bottoming out the wedge plate to the foot piece.
To conform with industry safety recommendations the wedge
stops 1/2 inches from the end of the stroke.
TOWING
is log splitter is equipped with pneumatic tires, a Class I coupler
(2 in. diameter ball required) and safety chains. Before towing,
the safety chains must be secured to the hitch or bumper of the
vehicle. Local regulations should be checked regarding licensing,
lights, towing, etc. Turn fuel shut off valve on the engine to the
“Off ” position prior to towing. Failure to do so may result in
flooding the engine. Do not exceed 45 mph when towing this log
splitter. See also Towing Safety on page 9 of this manual.
MAINTENANCE
1. Consult the operating and maintenance instructions of the
engine manufacturer for engine care and maintenance.
2. Always check the oil level of the hydraulic reservoir before
operation. Operating the log splitter without an adequate oil
supply will cause severe damage to the pump.
3. Change the oil filter after the first 25 hours of operation.
ere after change the oil filter every 100 hours or seasonally,
whichever comes first.
4. To drain the hydraulic oil, loosen the clamp on the hose
coming from the fitting on the bottom of the tank. It is located
just to the right of the oil filter.
5. If the wedge becomes dull or nicked, it can be removed and
sharpened. Remove the bolt that connects the wedge to the
cylinder. e hose from the valve may need to be removed.
Carefully lift the cylinder to allow the wedge to slide forward.
e wedge can now be lifted off and sharpened.
6. Clean the breather cap after 25 hours of operation. Clean
it more often when operated in dusty conditions. To clean,
remove the breather cap from the tank and flush with kerosene
or liquid detergent to remove the dirt.
7. See Repair and Maintenance on page 7 of this manual.
8. All replacement parts must meet manufacturer’s specifications.