
Instruction manual


29
Click OK to play DST image. Click CANCEL to play Non-DST image.
[“DST” image is displayed on screen] [“Non-DST” image is displayed on screen]
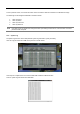
To make SCREEN SAVER setting on the DVR, go to the menu setup: SYSTEM > SYSTEM INFO and click “SCREEN
SAVER” to get the SCREEN SAVER setting window as shown below. Users can select CRT and/or VGA by checking the
boxes. Users can set the WAITING TIME that the monitor will automatically turn off.
Users can make the selected monitor on again by clicking a mouse, pressing any frontal key buttons or pressing any
buttons on the remote controller.
Note
WAITING TIME: Users can select the WAITING TIME from NONE, 1,2,3,4,5,6,7,8,9,10,20,30,40,50, up to 60
MIN. The SCREEN SAVER will not work when either WAITING TIME is set to “NONE” or both SPOT and VGA
checkbox are unchecked. SCREEN SAVER may not work, during upgrading the system, formatting HDD or data
backup process. The system continues to record while the monitor is turned off.
When it comes to the “AUTO LOGOFF” setting, please refer to the USER setting.