
Installation guide

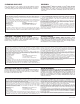


5
73421Rev.A
Step3a
Step3e
3
Step3b
A.
B
1
2
Step3c
1
2
3
C
Step3f
F.
1
2
1
2
3
1
2
6
Step3g
G.
1
3
4
5
2
E.
Step3d
SILICONE
1
2
D.
3
4
H.
5
1
2
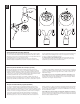
A.
Removestopper(1)andflange(2).
B.
Screwnut(1)allthewaydown.Pushwasher
(2)andgasket(3)down.
C.
Removetailpiece(1)frombody(2),add
plumber’stape(3),replacetailpiece.
D.
Applysiliconetoundersideofflange(1).Insertbody
(2)intosink.Screwflange(1)intobody(2).
E.
Pivot(1)mustfacefaucet.Pullassembly(2)down
firmlyandholdinplace.DONOTTWIST.
F.
Tightennut/washer/gasket(1),cleanoffexcesssili-
cone(2).DONOTTWIST.
G.
Removepivotnut(1).Installhorizontalrod
(2)andstopper(3)asremovable(4)ornon-
removable(5).Handtightenpivotnut(1).
H.
Attachhorizontalrod(1)tostrap(2)using
clip(3).Installliftrod(4),tightenscrew(5).
Connectassemblytodrain(6).
A.
Quiteeltapón(1)yelreborde(2).
B.
Atornillelatuerca(1)completamentehasta
abajo.Empujelaarandela/roldana(2)yel
empaque(3)haciaabajo.
C.
Quiteeltubodecola(1)delcuerpo(2),
apliquecintaTeflon
®
(3),coloqueotravez
eltubodecola.
D.
Apliquesilicónalaparteinteriordelreborde(1).
Inserteelcuerpo(2)enellavamanos.Atornilleel
reborde(1)enelcuerpo(2).
E.
Elpivote(1)debedeestardefrentealallave.Hale
elensamble(2)haciaabajofirmementeysujételo
ensitio.NOLOGIRE.
F.
Aprietelatuerca/arandela/empaque(1),limpieel
excesodesilicón(2).NOLOGIRE.
G.
Quitelatuercadelpivote(1).Instalela
barrahorizontal(2)yeltapón(3)como
desmontable(4)ofijo(5).Aprieteamano
latuercadelpivote(1).
H.
Unalabarrahorizontal(1)alabarrachata
(2)utilizandoelgancho(3).Instalelabarra
dealzar(4),aprieteeltornillo(5).Conecte
elensamblealdesagüe(6).
A.
Enlevezlabonde(1)etlacollerette(2).
B.
Serrezl’écrou(1)pourlefairedescen
complètement.Poussezlaronde
lle(2)
etlejoint(3)verslebas.
C.
Enlevezleraccorddroitdevidange(1)
ducorps(2),appliquezdurubandeTeflon
®
(3),puisremettezleraccorddroitenplace.
D.
Appliquezducomposéàlasiliconesouslacollerette
(1).Introduisezlecorps(2)danslav-abo,puisvissez
lacollerette(1)danslecorps(2).
E.
Lepivot(1)doitfairefaceaurobinet.Tirezl’ensemble
(2)verslebasfermementetmaintenez-leenplace.
PRENEZGARDEDELETORDRE.
F.
Serrezl’écroucontrelarondelleetlejoint(1),puis
enlevezlesurplusdecomposéàlasilicone(2).
PRENEZGARDEDETORDRELEPIVOT.
G.
Enlevezl’écroudupivot(1).Installezlatige
horizontale(2)etlabonde(3)demanière
quelabondesoitamovible(4)ounonamovi-
ble(5).Serrezl’écrou(1)dupivotàlamain.
H.
Fixezlatigehorizontale(1)aufeuillard(2)
àl’aidedel’agrafe(3).Installezlatigede
manoeuvre(4)etserrezlavis(5).Fixez
l’ensembleaurenvoi(6).
Metal Pop-Up
(Siga las instrucciones para el tipo de incluido desagüe automático con su modelo.) Desagüe Automático de Metal
(Suivez les instructions pour le type d’inclus renvoi mécanique avec votre modèle.) Renvoi Mécanique en Métal
(Follow the instructions for the type of pop-up included with your model.)