
Service Manual


Processor Thermal-Cooling Assembly: Dell XPS M2010 Service Manual
file:///C|/Users/santhosh_v.ASIA-PACIFIC/Desktop/Hawke/New%20folder/cpucool.htm[2/21/2014 11:26:23 AM]
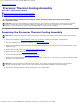
1 processor thermal-cooling assembly 2 captive screws (5)
Replacing the Processor Thermal-Cooling Assembly
NOTE: If you are replacing the thermal-cooling assembly without removing and replacing a new processor, you can
place the new thermal pad directly on any existing thermal pad already installed on the thermal-cooling assembly. It is
not necessary to remove an existing pad or to clean the surface.
1. Remove the backing from the new thermal pad, taking care not to tear the pad.
2. Place the adhesive-side of the pad on top of the old pad, and press it into place on the thermal-cooling assembly.
3. Place the processor thermal-cooling assembly over the processor.
4. Tighten in consecutive order the five captive screws, labeled "1" through "5", on the processor thermal- cooling
assembly.
5. Replace the left hard drive (see Replacing a Hard Drive).
6. Replace the top cover (see Replacing the Top Cover
).
7. Replace the cosmetic covers (see Replacing the Cosmetic Covers
).
NOTICE: To avoid damage to the keyboard, ensure that you attach the keyboard securely before moving the
computer.
8. Firmly attach the keyboard to the computer and close the display (see Closing the Display
).
9. Turn the computer upside down and replace the system battery (see Replacing the System Battery
).
Back to Contents Page