
Administrator Guide
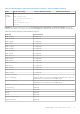


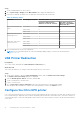


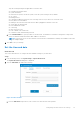

Table Of Contents
- Dell Wyse ThinOS Version 9.0 Administrator’s Guide
- Contents
- Introduction
- Supported platforms
- What's new in ThinOS 9.0.4024 (MR3) release?
- What's new in ThinOS 9.0.3030 (MR2) release?
- What's new in ThinOS 9.0.2081 (MR1) release?
- What's new in Wyse Management Suite 2.1?
- What's new in ThinOS 9.0?
- What's new in Wyse Management Suite 2.0?
- Feature comparison between ThinOS 9.0 and ThinOS 8.6
- Other documents you may need
- Upgrading the ThinOS firmware
- Register ThinOS devices to Wyse Management Suite
- Download the ThinOS firmware, BIOS, and application packages
- Add ThinOS firmware to the repository
- Upgrade ThinOS 8.6 to ThinOS 9.x
- Upgrade ThinOS 9.x to later versions using Wyse Management Suite
- Upgrade ThinOS 9.x to later versions using Admin Policy Tool
- Upload and push ThinOS 9.x application packages using Wyse Management Suite
- Upload and install ThinOS 9.x application packages using Admin Policy Tool
- Firmware installation using Dell Wyse USB Imaging Tool
- Upgrade BIOS
- Edit BIOS settings
- Downgrade to ThinOS 9.0.1136 by using Wyse Management Suite
- Delete ThinOS application packages
- Getting started with ThinOS 9.0
- End User License Agreement
- Configure ThinOS using First Boot Wizard
- Configure account privileges for ThinOS
- Connect to a remote server
- Connecting a display
- Connecting a printer
- Desktop overview
- Using the taskbar
- Classic desktop features
- Configuring thin client settings and connection broker settings
- Configure ThinOS using Admin Policy Tool
- Locking the thin client
- Shut down and restart
- Battery information
- Login dialog box features
- View the system information
- Sleep mode
- Import certificates to ThinOS from Admin Policy Tool or Wyse Management Suite
- ThinOS system variables
- Configuring the global connection settings
- Configuring connectivity
- Configuring the network settings
- Configuring the remote connections
- Configure the broker setup
- Configure the General Options
- Configure the authentication settings
- Configure the Imprivata OneSign server
- Configure objects on Imprivata Server
- Enroll a proximity card with Imprivata OneSign
- Use smart card as proximity card
- Imprivata Bio-metric Single Sign-On
- Grace period to skip second authentication factor
- Imprivata OneSign ProveID Embedded
- Configure the OneSign Appliance
- Configure the OneSign Admin Console
- Install the Imprivata PIE package on ThinOS
- Enable PIE mode on ThinOS
- Uploading OneSign appliance SSL certificate
- Import the OneSign appliance SSL certificate automatically
- Import OneSign appliance SSL certificate manually
- Configure Fast User Switching on ThinOS
- Configuring the central configurations
- Configure the VPN Manager
- Configuring the connection broker—Citrix
- Citrix Workspace app feature matrix
- Configure the Citrix broker setup
- Citrix HDX RealTime Optimization Pack for Skype for Business
- Cisco Jabber Softphone for VDI
- Microsoft Teams Audio Optimization
- Citrix ADC
- Citrix Cloud services
- Automatically configure using DNS for email discovery
- Citrix HDX Adaptive transport (EDT)
- HDX Adaptive Display V2
- Browser Content Redirection
- HTML5 Video Redirection
- Windows Media Redirection
- Enable UDP audio in a Citrix session
- QUMU Video Optimization Pack for Citrix
- Keyboard layout synchronization in VDA
- Citrix Self-Service Password Reset
- Citrix SuperCodec
- Anonymous logon
- Configure the Citrix session properties
- Using multiple displays in a Citrix session
- USB Printer Redirection
- Configure the Citrix UPD printer
- Configuring the thin client local settings
- Using the system tools
- Using Wyse Management Suite
- Functional areas of Wyse Management Suite console
- Managing groups and configurations
- Edit the ThinOS 9.x policy settings
- Managing devices
- Managing Jobs
- Managing rules
- Managing Events
- Managing users
- Portal administration
- Troubleshooting your thin client
- Capture an HTTP log using ThinOS
- System crashes, freezes or restarts abruptly
- Broker agent login failure
- Citrix desktop and application crashes abruptly
- Cisco Jabber and Skype for Business call failure
- Request a log file using Wyse Management Suite
- View audit logs using Wyse Management Suite
- System log and trace information
- Upgrade or conversion troubleshooting and logs
- How to debug with new support beyond ThinOS 8?
- How to debug with same support in ThinOS 8?
- Common log files and locations
- Frequently Asked Questions
- ThinOS-related questions
- How do I upgrade from ThinOS 8.6 to 9.0?
- What should I do if the package installation fails?
- Is Wyse Management Suite 2.0 the only way to manage ThinOS 9.0?
- Is USB Imaging Tool method a possible option for upgrading to ThinOS 9.0?
- Can ThinOS 9.0 be installed on a PCoIP device?
- Does ThinOS 9.0 support zero desktop?
- Does ThinOS 9.0 support ThinOS configurations using INI files?
- iPhone cannot be redirected to the Citrix Desktop session
- Android smartphone is not displayed in the session when redirected or mapped
- Does Citrix Workspace app replace Citrix Receiver on ThinOS?
- What is Workspace mode on ThinOS 9.0?
- Can I enable Flash content to be rendered using a local Flash Player on ThinOS 9.0?
- How do I verify if HDX Enlightened Data Transport Protocol is active?
- How do I check if HTML5 Video Redirection is working?
- How do I check if QUMU Multimedia URL Redirection is working?
- How do I check if Windows Media Redirection is working?
- Is persistent logging supported in ThinOS 9.0?
- Is tls.txt file included in network traces on ThinOS 9.0?
- Will ThinOS 9.0 device reboot automatically when the system crashes?
- Wyse Management Suite-related questions
- ThinOS-related questions

About this task
This section describes how to configure the Citrix UPD usage on your thin client.
Steps
1. Connect a printer to the ThinOS client.
2. From the desktop menu, click System Setup > Printer.
The Printer Setup dialog box is displayed.
3. Enter the name of the printer in the Printer Name box.
4. Enter any string of the Printer identification in the Printer Identification box.
5. Select the type of the printer class from the drop-down list, select the check box to enable the printer device, and click OK.
NOTE: In ThinOS 9.0, only PS class is supported.
6. Start a Citrix Virtual Apps and Desktops application connection.
7. Open the Devices and Printers in the desktop or application. Notice that the printer is mapped as the UPD printer by
default.
Next steps
To enable the printer server policies for Citrix UPD printer, see the Citrix documentation at docs.citrix.com.
Configuring the connection broker—Citrix 97