
Owners Manual

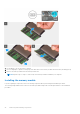


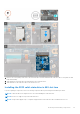

Table Of Contents
- Vostro 15 5515 Service Manual
- Working inside your computer
- Removing and installing components
- Recommended tools
- Screw list
- Major components of Vostro 15 5515
- Base cover
- Battery
- Battery cable
- Memory
- Solid-state drive—M.2 slot one
- Solid-state drive—M.2 slot two
- Wireless card
- Fan
- Coin-cell battery
- Heat sink
- Network-port bracket
- I/O board
- Speakers
- Touchpad
- Display assembly
- Power button with optional fingerprint reader
- Power-adapter port
- System board
- Palm-rest and keyboard assembly
- Drivers and downloads
- System setup
- Troubleshooting
- Getting help and contacting Dell

1. Slide and remove the solid-state drive mounting bracket from the mounting bracket slot on the palm-rest and keyboard
assembly.
2. Rotate the solid-state drive mounting bracket to 180 degrees.
3. Slide the solid-state mounting bracket into the mounting slot on the palm-rest and keyboard assembly.
4. Install the 2230 solid-state drive or 2280 solid-state drive, whichever applicable.
Solid-state drive—M.2 slot two
Removing the 2230 solid-state drive from M.2 slot two
NOTE: M.2 slot two supports only 2230 solid-state drive.
NOTE: This procedure applies only to computers shipped with a 2230 solid-state drive installed in M.2 slot two.
1. Follow the procedure in Before working inside your computer.
NOTE: Solid-state drives are fragile. Exercise care when handling the solid-state drive.
NOTE: To avoid data loss, do not remove the solid-state drive while the computer is in sleep or on state.
2. Remove the base cover.
The following image indicates the location of the 2230 solid-state drive that is installed in M.2 slot two and provides a visual
representation of the removal procedure.
28
Removing and installing components