
Owners Manual


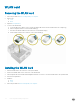


a Pull one side of the hard drive bracket to disengage the pins on the bracket from the slots on the hard drive [1].
b Lift the hard drive out of the hard drive bracket [2].
Installing the 2.5 inch hard drive assembly
1 Align and insert the pins on the hard drive bracket with the slots on one side of the hard drive.
2 Flex the other side of the hard drive bracket, and align and insert the pins on the bracket into the hard drive.
3 Slide the hard drive assembly into the slot on the computer until it clicks into place.
4 Close the front panel door.
5 Connect the SATA cable and the power cable to the connectors on the hard drive.
6 Install the:
a bezel
b cover
7 Follow the procedure in After working inside your computer.
Optical drive
Removing the optical drive assembly
1 Follow the procedure in Before working inside your computer.
2 Remove the:
a cover
b bezel
3 To remove the optical drive assembly:
a Open the front panel door.
b Disconnect the data cable and power cable from the connectors on the optical drive assembly [1, 2].
NOTE
: You may need to unroute the cables from the tabs under the drive cage to allow you to disconnect
the cables from the connectors.
c Close the front panel door [3].
d Remove the 6-32xL3.6 screw that secures the optical drive assembly to the computer [4].
e Slide the optical drive assembly out of the computer [5].
12
Removing and installing components