
Owners Manual


Steps
1. Connect the GPU/FPGA power cable to the connector on the system board.
NOTE: While installing a GPU on riser 1, connect the GPU/FPGA power cable to the connector on riser 1 and route the
cable through the slot on the GPU air shroud.
NOTE: While installing a GPU on risers 2 or riser 3, connect the GPU/FPGA power cable to the connector on the
system board.
2. Connect the other end of the GPU/FPGA power cable to the GPU.
3. Lift the expansion card latch and remove the filler bracket.
NOTE: You must install a filler bracket over an empty expansion card slot to maintain Federal Communications
Commission (FCC) certification of the system. The brackets also keep dust and dirt out of the system and aid in proper
cooling and airflow inside the system.
NOTE: The filler bracket is necessary to maintain proper thermal conditions.
4. Align the connector on the GPU with the connector on the riser.
5. Insert the GPU into the riser until it is fully seated.
6. Press the PCIe lock on the GPU air shroud and riser to release the PCIe card holder latch.
NOTE: Ensure that the GPU edges are seated properly in the GPU air shroud slot and PCIe card holder latch to secure
the GPU in place.
7. Close the expansion card latch.
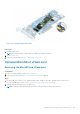
Figure 108. Installing GPU 1
122
Installing and removing system components