
Owner manual


7. Connect the other end of the ribbon cable to the diskette drive connector on the SCSI backplane. See Figure5-4.
8. Close the system covers. See "Closing the System Covers."
9. Reconnect the system and peripherals to their electrical outlets and turn them on.
10. Replace the optional front bezel, if applicable. See "Replacing the Bezel."
Installing a CD Drive
The optional CD drive is installed in a carrier that slides into the peripheral bay.
1. Remove the optional front bezel, if attached. See "Removing the Bezel."
2. Turn off the system, including any attached peripherals, and disconnect the system from the electrical outlet.
3. Open the system covers. See "Opening the System Covers."
4. If a filler plate is installed in the drive bay, remove it now.
5. If the drive carrier and the drive were supplied separately, install the drive in the carrier. See Figure4-26.
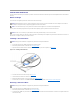
Figure 4-26.InstallingaCDDriveinaDriveCarrier
a. Match the back end of the drive with the back end of the carrier, which has a retention tab.
b. Fit the right edge of the CD drive into the carrier tray, pressing the drive firmly backward against the stop tab near the right rear corner of the
carrier.
c. Lower the left side of the drive into the carrier until the drive snaps into place.
6. Slide the drive into the peripheral bay until it is fully inserted. See Figure4-27.
Figure 4-27.InstallingaCDDrive
CAUTION: Only trained service technicians are authorized to remove the system cover and access any of the components inside the system. See
your System Information Guide for complete information about safety precautions, working inside the system, and protecting against
electrostatic discharge.