
Users Guide


2. Remove the computer cover (see Removing the Computer Cover).
3.
Remove any add
-
in cards on the system board (see
Cards
).
3. Remove any add-in cards on the system board (see Cards).
4. Remove the processor and heat sink assembly (see Speakers).
5. Remove the memory modules (see Removing Memory) and document which memory module is removed from each memory socket so that the memory
modules can be installed in the same location after the board is replaced.
6. Disconnect all cables from the system board. Note the routing of all cables as you remove them so that you can reroute them correctly after installing
the new system board.
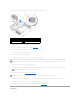
7. Remove the remaining seven screws from the system board. (Four other screws were removed with the heat sink assembly.)
8. Slide the system board assembly toward the front of the computer, and then lift the board up and away.
System Board Screws
9. Place the system board that you just removed next to the replacement system board to compare and ensure they are identical.
Installing the System Board
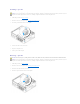
1. Gently align the board into the chassis and slide it toward the back of the computer.
2. Using the seven screws, secure the system board to the chassis.
3. Replace the cables that you removed from the system board.
4. Replace the processor and the heat sink assembly (see Installing the Processor).
5. Replace the memory modules into the memory sockets at the same locations from which you removed them (see Installing Memory).
6. Replace any add-in cards on the system board.
7. Replace the computer cover (see Replacing the Computer Cover).
1
system board
2
screws (7)
CAUTION: Failure to replace and tighten all screws may cause electrical shock as these screws are a key part of the system grounding.
NOTICE: Ensure that the heat sink assembly is correctly seated and secure.
NOTICE: To connect a network cable, first plug the cable into the network device and then plug it into the computer.