
Deployment Guide


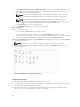

b. Under Admin User Account, in the Admin User Name text box, enter the Admin user name. Enter
the username as domain\user or domain/user or user@domain. The Admin user account is used
by the OMIVV for vCenter administration.
NOTE: One instance of OMIVV can support upto 10 vCenters which are part of the same
vCenter SSO. Multiple independent instances of vCenters are currently not supported.
NOTE: Registering using FQDN is not mandatory but highly recommended. For both
(Internet Protocol and Fully Qualified Domain Name) IP and FQDN based registrations, the
host name of the vCenter should be properly resolvable by the DNS server.
c. In the Password text box, enter the password.
d. In the Verify Password text box, enter the password again.
22. Click Register.
23. Do one of the following:
• If you are using theOMIVV trial version, skip to step 12.
• If you are using the full product version, there is a license.xml file that will be sent as an
attachment to the registered e-mail. This file contains your product license, and you must import
this license to your virtual appliance. To import the license file, click Upload License.
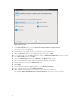
24. On the Upload License window, click the Browse button to navigate to the license file. Click Upload
to import the license file.
NOTE: If the license file is modified or edited in any way, the license file will not work.
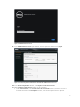
25. Once the OMIVV is registered, the OMIVV icon displays under the Management category of the
vCenter home page.
Figure 4. The OMIVV Successfully Added to vCenter
Installation Verification
The following steps verify that the OMIVV installation was successful:
1. Log on to vSphere client and confirm that the OMIVV icon appears inside of vSphere Client. If it does
not, restart the vSphere Client and check again.
2. Check that vCenter can communicate with the OMIVV by attempting a ping command from the
vCenter server to the virtual appliance IP address or hostname.
10