Dell™ Latitude™ E6500 安装与快速参考指南 本指南提供了计算机的功能概览、规格、快速设置、软件和故障排除信息。 有关操作系统、设备和技术的详细信息,请参阅 support.dell.com 上的 《Dell 技术指南》。 型号 PP30L w w w. d e l l . c o m | s u p p o r t . d e l l .
注、注意和警告 注:注表示可以帮助您更好地使用计算机的重要信息。 注意:注意表示硬件的潜在损坏或数据丢失,并且告诉您如何避免此类问题。 警告:警告表示潜在的财产损坏、人身伤害或死亡。 如果您购买的是 Dell™ n 系列计算机,则本文中关于 Microsoft® Windows® 操作系统的任何参考内容均不适用。 Macrovision 产品通告 本产品采用了版权保护技术,它通过申请属于 Macrovision Corporation 和其 它 产 权 所 有 者 的 美 国 专 利 权 以 及 其 它 知 识 产 权 来 进 行 保 护。必 须 经 Macrovision Corporation 授权才可以使用此版权保护技术。此技术仅供家庭 和其它限制性观看场所使用,除非经 Macrovision Corporation 以其它方式授 权。禁止进行反向工程或反编译。 ____________________ 本说明文件中的信息如有更改,恕不另行通知。 © 2008 Dell Inc. 版权所有,翻印必究。 未经 Dell Inc.
目录 1 关于计算机 . . . . . . . . . . . . . . . . . . . . . . . . 7 . . . . . . . . . . . . . . . . . . . . . . . . . 7 . . . . . . . . . . . . . . . . . . . . . . . . . . . 9 正面视图 . 后视图 卸下电池 . . . . . . . . . . . . . . . . . . . . . . . . . 无线开关和 Dell™ Wi-Fi Catcher™ 网络定位器. 2 . . . 11 . . . . . . . . . . . . . . . . . . . . . . . 13 . . . . . . . . . . . . . . . . . . . . . . . . 13 设置计算机 快速设置 . 10 连接到 Internet . . . . . . . . . . . . . . . . . . . . . 设置 Internet 连接. 将信息传送到新计算机 ® 15 . .
对软件问题和硬件问题进行故障排除 . . . . . . 39 . . . . . . . . . . . . . . . . . . 40 故障排除提示 . . . . . . . . . . . . . . . . . . . . . . 41 电源问题 . . . . . . . . . . . . . . . . . . . . . . 42 内存问题 . . . . . . . . . . . . . . . . . . . . . . 43 Dell Diagnostics 锁定和软件问题 . . . . . . . . . . . . . . . . . . Dell 技术更新服务 . . . . . . . . . . . . . . . . . Dell Support 公用程序 5 重新安装软件 驱动程序 . . . . . . . . . . . . . . . . . . . . . . . . . . . . . . . . . . . . . . . . . . . . . . . . . . . . . . . . . . .
退回项目以要求保修或退款 . 致电之前 . . . . . . . . . . . . . . 58 . . . . . . . . . . . . . . . . . . . . . . . . 58 与 Dell 联络 . 7 . . . . . . . . . . . . . . . . . . . . . . 60 . . . . . . . . . . . . . . . . . . . . . . . . . 61 . . . . . . . . . . . . . . . . . . . . . . . . . . . . . . .
目录
关于计算机 注:有关计算机功能的详细信息,请参阅计算机或 support.dell.
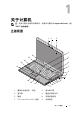
10 音频 (输出)和 麦克风 (输入)连接器 11 智能卡插槽 12 IEEE 1394a 连接器 13 无线开关和 Dell™ Wi-Fi Catcher™ 网络定 位器按钮 14 扬声器 15 指纹读取器 (可选) 16 介质托架 17 PC 卡插槽 18 非接触式智能卡读取器 19 定点杆 20 显示屏释放闩锁 21 定点杆按钮 / 触摸板按钮 22 触摸板 23 扬声器 24 设备状态指示灯 9 USB 连接器 (2 个) 25 环境光传感器 8 关于计算机
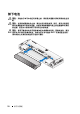
后视图 1 2 3 4 5 14 13 12 11 10 9 6 7 8 1 SecureDigital (SD) 卡插槽 2 ExpressCard 插槽 3 通风孔 4 视频连接器 5 USB 连接器 6 eSATA/USB 连接器 7 安全缆线孔 8 交流适配器连接器 9 DisplayPort 10 电源指示灯 / 电池指示灯 11 对接定位标记 12 电池 13 网络连接器 (RJ-45) 14 调制解调器连接器 (RJ-11) 警告:请勿将物品推入或阻塞通风孔,或使灰尘沉积在冷却通风孔处。 Dell 计算机运行时,请勿将其放在通风不佳的环境中,例如合上的公文包。通风 受阻会损坏计算机或引起火灾。计算机在变热时会打开风扇。风扇噪音是正 常现象,并不表示风扇或计算机有问题。 关于计算机 9
卸下电池 警告:开始执行本节中的任何步骤之前,请阅读并遵循计算机附带的安全说 明。 警告:在拆卸或更换电池之前,请先关闭计算机电源。然后,断开交流适配 器与电源插座和计算机的连接,并断开调制解调器与墙上的连接器和计算机 的连接,然后从计算机中卸下所有其它外部电缆。 警告:使用不兼容的电池可能会增加起火或爆炸的危险。更换电池时,请仅 使用从 Dell 购买的兼容电池。此电池设计为与您的 Dell™ 计算机配合使用。 请勿将其它计算机的电池用于您的计算机。 10 关于计算机
无线开关和 Dell™ Wi-Fi Catcher™ 网络定位器 无线开关图标 Dell Wi-Fi Catcher 网络定位器图标 使用无线开关启用或禁用无线网络设备和 Wi-Fi Catcher 网络定位器来定位 网络。有关无线开关和 Wi-Fi Catcher 网络定位器的详细信息,请参阅计算 机或 support.dell.
关于计算机
设置计算机 快速设置 警告:开始执行本节中的任何步骤之前,请阅读并遵循计算机附带的安全说 明。 警告:此交流适配器可以与世界各地的电源插座配合使用。但是,电源连接 器和配电盘则因国家和地区的不同而有所差异。使用不兼容的电缆或未正确 地将电缆连接至配电盘或电源插座可能会引起火灾或损坏设备。 注意:从计算机上断开交流适配器电缆的连接时,请握住连接器(而不是电 缆本身) ,并稳而轻地将其拔出,以免损坏电缆。当您缠绕交流适配器电缆 时,请确保顺着交流适配器连接器的角度进行,以免损坏电缆。 注:某些设备如果您没有订购,则可能不会包含在内。 1 将交流适配器分别连接到计算机上的交流适配器连接器和电源插座上。 2 连接网络电缆。 设置计算机 13
3 连接 USB 设备,例如鼠标或键盘。 4 连接 IEEE 设备,例如 DVD 播放器。 5 打开计算机显示屏,按下电源按钮启动计算机。 注:在安装任何插卡或将计算机连接到一个对接设备或其它外部设备(如打 印机)之前,建议开启并关闭计算机至少一次。 14 设置计算机
6 连接至 Internet。有关详情,请参阅第 15 页上的 “连接到 Internet”。 4 5 3 3 2 2 1 1 1 Internet 服务 2 电缆或 DSL 调制解调器 3 无线路由器 4 具有有线连接的膝上型计算机 5 具有无线连接的膝上型计算机 连接到 Internet 注:ISP 和 ISP 所提供的服务会因国家和地区的不同而有所差异。 要连接至 Internet,您需要调制解调器或网络连接,以及因特网服务提供商 (ISP)。如果使用的是拨号连接,请先将电话线连接至计算机上的调制解调器 连接器及墙上的电话连接器,然后再设置 Internet 连接。如果您使用的是 DSL 或电缆 / 卫星调制解调器连接,请与您的 ISP 或蜂窝式电话服务联络以 获得设置说明。 设置 Internet 连接 要用您的 ISP 提供的桌面快捷方式设置 Internet 连接,请: 1 保存并关闭所有打开的文件,退出所有打开的程序。 2 双击 Microsoft® Windows® 桌面上的 ISP 图标。 3 按照屏幕上的说明完成设置。 如果桌面上没有 ISP 图标,或者您要设
注:请准备好您的 ISP 信息。如果您没有 ISP,请通过 Microsoft® Windows® “开始”菜单下的帮助和支持功能参考 “连接到 Internet”向导。 Microsoft® Windows® XP 操作系统 1 保存并关闭所有打开的文件,退出所有打开的程序。 2 依次单击 “开始” → “Internet Explorer” → “连接到 Internet”。 3 在下一个窗口中,单击相应选项: • 如果您没有 ISP,请单击 “从 Internet 服务提供商 (ISP) 列表选择”。 • 如果您已从您的 ISP 获得设置信息,但未收到设置 CD,请单击 “手动设置我的连接”。 • 如果已有设置 CD,请单击 “使用我从 ISP 得到的 CD”。 4 单击 “下一步”。 如果在步骤 3 中选择了 “手动设置我的连接”,请继续步骤 5。否则, 请按照屏幕上的说明完成设置。 注:如果您无法确定要选择的连接类型,请与您的 ISP 联络。 5 单击“您想怎样连接到 Internet?”下的相应选项,然后单击“下一步”。 6 使用您的 ISP 提供的设置信息完成设置。 Microso
将信息传送到新计算机 Microsoft® Windows® XP 操作系统 Windows XP 提供了 “文件和设置转移向导”,用于将数据从源计算机转移 到新计算机。 您可以通过网络或串行连接将数据传输至新计算机,或者先将数据存储在可 移动介质 (例如可写 CD)中,然后再传输至新计算机。 注:您可以通过用串行电缆将新旧计算机的输入 / 输出 (I/O) 端口直接连接起 来,从而将信息从旧计算机传输至新计算机。有关在两台计算机之间设置直 接电缆连接的说明,请参阅 Microsoft 知识库文章 #305621,标题为 “如何 在两台 Windows XP 计算机之间建立直接电缆连接”。该信息在某些国家和 地区可能不可用。 要将信息传输到新计算机,必须运行 “文件和设置转移向导”。 使用操作系统介质运行 “文件和设置转移向导” 注:此过程需要操作系统介质。此介质是可选的,并非所有计算机都附带此 介质。 要准备新计算机以进行文件传输,请: 1 打开 “文件和设置转移向导”,方法是:依次单击 “开始” → “所有 程序” → “附件” → “系统工具” → “文件和设置转移向导”。 2 系统显示 “文件和
6 在“要转移哪些项目?”屏幕上,选择要传输的项目并单击“下一步”。 信息复制完毕后,系统将显示 “正在完成收集阶段”屏幕。 7 单击 “完成”。 要将数据传输至新计算机,请: 1 在新计算机上的 “请转到您的旧计算机”屏幕中,单击 “下一步”。 2 在“文件和设置在哪儿?”屏幕上,选择传输设置和文件的方法,并单 击 “下一步”。 该向导将收集到的文件和设置应用到新计算机。 3 在 “完成”屏幕上,单击 “完成”,然后重新启动新计算机。 不使用操作系统介质运行 “文件和设置转移向导” 要在没有操作系统介质的情况下运行 “文件和设置转移向导”,必须创建向 导磁盘,该磁盘使您可以向可移动介质中创建备份映像文件。 要创建向导磁盘,请使用装有 Windows XP 的新计算机并执行以下步骤: 1 打开 “文件和设置转移向导”,方法是:依次单击 “开始” → “所有 程序” → “附件” → “系统工具” → “文件和设置转移向导”。 2 系统显示 “文件和设置转移向导”欢迎屏幕时,单击 “下一步”。 3 在“这是哪台计算机?”屏幕上,依次单击“新计算机”→“下一步”。 4 在 “您有 Windows XP CD 吗
6 在“要转移哪些项目?”屏幕上,选择要传输的项目并单击“下一步”。 信息复制完毕后,系统将显示 “正在完成收集阶段”屏幕。 7 单击 “完成”。 要将数据传输至新计算机,请: 1 在新计算机上的 “请转到您的旧计算机”屏幕中,单击 “下一步”。 2 在“文件和设置在哪儿?”屏幕上,选择传输设置和文件的方法,并单 击 “下一步”。请按照屏幕上的说明进行操作。 该向导将读取收集到的文件和设置,并将它们应用到新计算机。 所有设置和文件均应用完毕后,系统将显示 “完成”屏幕。 3 单击 “完成”并重新启动新计算机。 注:有关此过程的详细信息,请在 support.dell.
设置计算机
规格 注:所提供的配置可能会因地区的不同而有所差异。有关计算机配置的详细 信息,请单击 “开始” → “帮助和支持”,然后选择选项以查看关于计算机 的信息。 处理器 处理器类型 Intel® Core™ 2 Duo 处理器 二级高速缓存 6 MB 前端总线频率 1067 MHz 存放时 硬盘驱动器 SATA 第二个硬盘驱动器 在介质托架 (可选) 系统信息 芯片组 Intel 45 Express 数据总线宽度 64 位 DRAM 总线宽度 64 位 处理器地址总线宽度 36 位 快擦写 EPROM SPI 32 Mbit PCI 总线 (仅离散图形) x16 PCIe 规格 21
PC 卡 CardBus 控制器 Ricoh R5C847 PC 卡连接器 一个 (支持一个 I 类或 II 类 PC 卡) 支持的插卡 3.
内存 (续) 最小内存 512 MB (1 个 DIMM) 最大内存 8 GB (仅适用于 Windows Vista) 注:双通道带宽操作要求两个内存插槽都必须插卡且必须大小相符。 注: 显示的可用内存没有反映出已安装的所有内存的最大容量,因为某些内存 是为系统文件保留的。 端口和连接器 音频 麦克风连接器、立体声耳机 / 扬声器连接器 IEEE 1394a 4 针连接器 I/O 插槽 SD 多卡读取器支持 SD、SDIO、SD-HC、 Mini-SD (带适配器) MMC、 MMC+、 Mini-MMC (带适配器) 用于一个 54 毫米 或 34 毫米 卡的 ExpressCard 插槽 一个 CardBus/PCMCIA 插槽 集成智能卡读取器 小型插卡支持 (内部扩充槽) 一个专用于无线局域网 (WLAN) 的半小型 插卡插槽 一个专用于无线广域网(WWAN、移动宽 带)的全小型插卡插槽 一个专用于无线个人区域网络 (WPAN、 Bluetooth® 无线技术或超带宽 [UWB])的 全小型插卡插槽 WWAN 或 WPAN 全小型插卡插槽也可用 于 Intel 闪存 介质托
端口和连接器 (续) 视频 DisplayPort 支持通过加密解密器的 HDMI 和 DVI 通信 调制解调器: 内部调制解调器 网络适配器 10/100/1000 以太网 LAN,位于系统板上 无线 WLAN 移动宽带 Bluetooth® 无线技术 WI-MAX 超宽带技术 移动宽带 全小型插卡 GPS 移动宽带小型插卡或仅 GPS 小型插卡 视频 注: Dell™ 计算机同时具有集成视频选件和离散视频选件。 视频类型 系统板上有集成或独立显卡,硬件加速 数据总线 集成显卡或 PCI-E 图形 x16 视频控制器 Intel Extreme (集成) nVIDIA Quadro NVS 160M (离散) 视频内存 最低 256 MB (集成) 256 MB 专用内存 (离散) 视频输出 VGA、 DisplayPort 外部支持 VGA DisplayPort DVI (DisplayPort 适配器或通过 E-Port) HDMI (DisplayPort 适配器) 音频 音频类型 双声道高保真音频 (Azalia) 音频编码解码器 IDT 9
音频 (续) 立体声转换 24 位 (模拟 - 数字和 数字 - 模拟) 接口: 内部 内部高保真音频 (Azalia) 编码解码器 外部 外部麦克风输入连接器、立体声耳机 / 扬声 器连接器 扬声器 两个 1 W 4 欧姆扬声器 内置扬声器放大器 每声道 1 W 4 欧姆 内置麦克风 单数字麦克风 音量控件 音量控制按钮和静音按钮 显示屏 类型 (有源阵列 TFT) WXGA、 WXGA+、 WUXGA 尺寸 391 毫米 (15.
显示屏 (续) 像素点距: WXGA: 0.2373 WXGA+: 0.2109 WUXGA: 0.1725 典型功耗 (背光面板): WXGA: 6.2 W (最大)未丢失转换卡 WXGA+: 5.8 W (最大) WUXGA: 13.0 W (最大) 键盘 按键数 83 (美国和加拿大); 84 (欧洲); 87 (日本) 布局 QWERTY/AZERTY/Kanji 尺寸 标准全尺寸 (键距 19 毫米) 触摸板 X/Y 轴分辨率 (图形表模式) 240 cpi 尺寸: 宽度 65.8 毫米 (2.59 英寸)传感器有效区域 高度 38.5 毫米 (1.52 英寸)矩形 电池 类型 4 单元 “智能”锂离子 6 单元 “智能”锂离子 9 单元 “智能”锂离子 12 单元 “智能”聚合物超薄电池 尺寸, 4 单元锂离子电池: 26 厚度 206 毫米 (8.11 英寸) 高度 19.8 毫米 (0.78 英寸) 宽度 47.0 毫米 (1.85 英寸) 重量 0.24 公斤 (0.
电池 (续) 尺寸, 6 单元锂离子电池: 厚度 206 毫米 (8.11 英寸) 高度 19.8 毫米 (0.78 英寸) 宽度 47.0 毫米 (1.85 英寸) 重量 0.33 公斤 (0.73 磅) 尺寸, 9 单元锂离子电池: 厚度 208 毫米 (8.67 英寸) 高度 22.3 毫米 (0.88 英寸) 宽度 68.98 毫米 (2.70 英寸) 重量 0.51 公斤 (1.12 磅) 尺寸, 12 单元聚合物超薄电池: 厚度 14.48 毫米 (0.57 英寸) 高度 217.24 毫米 (8.55 英寸) 宽度 322.17 毫米 (12.68 英寸) 电池电压 11.1 VDC 瓦特小时: 4 单元主电池 35Whr, 2.6 Ahr 6 单元主电池 56Whr, 2.6 Ahr 9 单元高容量电池 85Whr, 2.
交流适配器 类型 65 W 旅行适配器 90 W 交流适配器 130 W Dell 适配器 PA-4E 输入电压 100–240 VAC 频率 50–60 Hz 输出电压 19.5 VDC 65 W 旅行适配器 输入电流 输出电流 1.5 A 90 W 交流适配器 输入电流 输出电流 1.5 A 130 W Dell 适配器 PA-4E 输入电流 输出电流 2.5 A 3.34 A 4.62 A 6.7 A 尺寸 高度 70.22 毫米 (2.76 英寸) 宽度 146.64 毫米 (5.77 英寸) 厚度 16.3 毫米 (0.64 英寸) 温度范围: 运行时 0° 至 35°C (32° 至 95°F) 存放时 –40° 至 65°C (–40° 至 149°F) 物理规格 高度 前侧 27 毫米 (1.06 英寸) 后侧 33.3 毫米 (1.31 英寸) 宽度 358 毫米 (14.1 英寸) 厚度 244 毫米 (9.
物理规格 (续) 重量 2.57 千克 (5.69 磅) ,带有 6 单元电池和 光盘驱动器 2.46 千克 (5.41 磅) ,带有 6 单元电池; 不带光盘驱动器 环境参数 温度范围: 运行时 0° 至 35°C (32° 至 95°F) 存放时 –40° 至 65°C (–40° 至 149°F) 相对湿度 (最大): 运行时 10% 至 90% (非冷凝) 存放时 5% 至 95% (非冷凝) 最大振动 (使用模拟用户环境的随机振动频谱测量): 运行时 0.66 GRMS 存放时 1.3 GRMS 最大撞击 (在运行时硬盘驱动器处于运行状态和 2 毫秒半正弦波脉冲的情况下 测量; 存储环境中,在硬盘驱动器磁头归位和 2 毫秒 半正弦波脉冲的情况下测 量): 运行时 143 G 存放时 163 G 海拔高度 (最大): 运行时 –15.2 至 3048 米 (–50 至 10,000 英尺) 存放时 –15.
规格
故障排除 警告:为降低触电、被转动的扇叶划伤或其它可预知伤害的可能性,请始终 在打开主机盖之前将计算机从电源插座拔下。 警告:开始执行本节中的任何步骤之前,请阅读并遵循计算机附带的安全说 明。 工具 电源指示灯 位于计算机正面和背面左角处的双色电源按钮指示灯亮起、闪烁或者保持稳 定可指示不同的状态。如果电源指示灯: 电源指示灯状态 指示 关闭 表明计算机已关闭或未接通电源。 呈蓝色稳定亮起并且 计算机无响应 显示器已连接但可能未通电。 蓝色闪烁 表明计算机处于待机模式。按键盘上的任意键、 移动鼠标或按电源按钮均可恢复正常运行状态。 呈琥珀色闪烁 表明计算机已接通电源,可能有设备 (如内存模 块或图形卡)出现故障或未正确安装。 呈琥珀色稳定亮起 可能存在电源问题或内部设备出现故障。 哔声代码 在启动期间如果显示器无法显示错误或问题,您的计算机可能会发出一系列 哔声。这一连串哔声称为哔声代码,用于识别问题。一组哔声代码可能由连 续三声短的哔声组成。此哔声代码表明计算机可能遇到母板故障。 故障排除 31
如果计算机在启动期间发出哔声: 1 请记下哔声代码。 2 运行 Dell™ Diagnostics,以识别更严重的故障原因 (请参阅第 40 页上 的 “Dell Diagnostics”)。 代码 说明 (连续短促 的哔声) 建议的解决方法 1 BIOS 校 验 和 故 障。 与 Dell 联络。 母板可能发生故障。 2 未检测到内存模块 1 如果您已安装两个或多个内存模块,请卸下 所有模块,再重新安装一个模块 (请参阅 support.dell.com 上适用于您的 《维修手 册》),然后重新启动计算机。如果计算机 启动正常,请重新安装其它模块。继续该步 骤直至您找到出现故障的模块,或者重新安 装所有模块都未发现故障。 2 如果可用,请在计算机中安装同一类型的无 故障内存 (请参阅 support.dell.
错误信息 警告:开始执行本节中的任何步骤之前,请阅读并遵循计算机附带的安全说 明。 如果此处列出的信息未包括您收到的错误信息,请参阅信息出现时所运行的 操作系统或程序的说明文件。 A U X I L I A R Y D E V I C E F A I L U R E ( 辅助设备出 现故障) — 可能是触摸板或外 部鼠标出现故障。对于外部鼠标,请检查电缆的连接。启用系统设置程序中 的 “定点设备”选项。有关详情,请参阅 support.dell.
T H E F I L E B E I N G C O P I E D I S T O O L A R G E F O R T H E D E S T I N A T I O N D R I V E (要 复 制的文 件对 目标驱 动 器 而言太大) — 您尝试复制的文件太大,磁盘上放 不下,或者磁盘已满。请尝试将文件复制到其它磁盘,或者使用容量更大的 磁盘。 A FILENAME CANNOT CONTAIN ANY OF THE FOLLOWING CHARACTERS: \ / : * ? " < > |(文件 名不能包含 以下任何字 符之一:\ / : * ? " < > |) — 请勿在文件名中使用这些字符。 G A T E A 2 0 F A I L U R E (A 2 0 门电 路故障) — 内存模块可能松动。重新安 装内存模块,如果有必要,请更换内存模块。有关详情,请参阅 support.dell.
H A R D - D I S K D R I V E R E A D F A I L U R E (读取硬盘 驱 动 器失败 ) — 硬 盘 驱 动 器可能出现故障。关闭计算机,卸下硬盘驱动器 (请参阅 support.dell.
M E M O R Y A L L O C A T I O N E R R O R (内存 分配 错误) — 要运行的软件与操作 系统、其它程序或公用程序发生冲突。关闭计算机并等待 30 秒钟,然后重新 启动计算机。再次尝试运行此程序。如果仍然显示此错误信息,请参阅软件 说明文件。 MEMOR Y DATA LINE FAILURE AT ADDRESS, READ VALUE EXPECTING V A L U E ( 定址、 读取所需的 值时,内存数据线 路出现 故 障 ) — 可 能 是 某 个内存模块出现故障或未正确就位。重新安装内存模块,如果有必要,请更 换内存模块。有关详情,请参阅 support.dell.
O P T I O N A L R O M B A D C H E C K S U M (可选 R O M 的校验 和错 误 ) — 可 选 的 ROM 出现错误。请与 Dell 联络 (请参阅第 60 页上的 “与 Dell 联络”)。 A R E Q U I R E D . D L L F I L E W A S N O T F O U N D ( 未找 到所需 的 .
T I M E - O F - D A Y C L O C K S T O P P E D (计时时钟停止) — 支持系统配置设置的 保留电池可能需要重新充电。将计算机连接至电源插座,为电池充电。如果 问题仍然存在,请与 Dell 联络 (请参阅第 60 页上的 “与 Dell 联络”)。 T I M E - O F - D A Y N O T S E T - P L E A S E R U N T H E S Y S T E M S E T U P P R O G R A M (未设 置时间 - 请运行系统设置程序) — 系统设置程序中存储的时间或日期与 系统时钟不匹配。更正 “日期”和 “时间”选项的设置。有关详情,请参阅 support.dell.
H A R D - D I S K D R I V E F A I L U R E (硬盘 驱 动 器出现 故 障 ) — 硬盘驱动器可能 在 POST 过程中出现故障。请检查电缆连接、交换硬盘,或参阅第 60 页上 的 “与 Dell 联络”以获得帮助。 H A R D - D I S K D R I V E R E A D F A I L U R E (读取硬盘 驱 动 器失败 ) — 硬 盘 驱 动 器启动测试过程可能出现故障 (请参阅第 60 页上的 “与 Dell 联络”以获得 帮助)。 K E Y B O A R D F A I L U R E (键盘故障) — 键盘故障或键盘电缆松动。 N O B O O T D E V I C E A V A I L A B L E (无可用的引导 设备) — 硬 盘 驱 动 器 上 无 可引导分区,或硬盘驱动器电缆松动,或不存在可引导设备。 • 如果硬盘驱动器是您的引导设备,请确保电缆已连接,且驱动器已正确 安装并分区为引导设备。 • 进入系统设置程序,并确保引导顺序信息正确(请参阅 support.dell.
Windows Vista: 1 单击 Windows Vista “开始”按钮 ,然后单击 “帮助和支持”。 2 在搜索字段中键入 “硬件疑难解答”,然后按 键开始搜索。 3 在搜索结果中,选择最能说明问题的选项,然后按照其余的故障排除 步骤进行操作。 Dell Diagnostics 警告:开始执行本节中的任何步骤之前,请阅读并遵循计算机附带的安全说 明。 何时使用 Dell Diagnostics 如果您的计算机出现问题,在与 Dell 联络寻求技术帮助之前,请执行“锁定 和软件问题”(请参阅第 43 页上的 “锁定和软件问题”)中的检查步骤并运 行 Dell Diagnostics。 建议您在开始之前先打印这些步骤。 注意:Dell Diagnostics 只能在 Dell 计算机上使用。 注:Dell Drivers and Utilities 介质是可选的,您的计算机可能未附带此介质。 请参阅 support.dell.
从 Drivers and Utilities 介质启动 Dell Diagnostics 1 放入 Drivers and Utilities 介质。 2 关闭并重新启动计算机。 系统显示 DELL 徽标时,立即按 键。 注: 如果等待时间过长,系统已显示操作系统徽标,请继续等待直至看 到 Microsoft® Windows® 桌面,然后关闭计算机并再试一次。 注: 以下步骤只能使更改的引导顺序在本次启动时有效。下一次启动 时,计算机将按照系统设置程序中指定的设备进行启动。 3 系统显示引导设备列表时,高亮度显示 CD/DVD/CD-RW 并按 键。 4 从系统显示的菜单中选择 Boot from CD-ROM (从 CD-ROM 引导) 选项并按 键。 5 键入 1 以启动该 CD 菜单,然后按 键继续。 6 从编号列表中选择 Run the 32 Bit Dell Diagnostics (运行 32 位 Dell Diagnostics)。如果其中列出了多个版本,请选择适用于您的计算机的 版本。 7 系统显示 Dell Diagnos
电源问题 警告:开始执行本节中的任何步骤之前,请阅读并遵循计算机附带的安全信 息。 如 果电源指示灯不亮 — 表明计算机已关闭或未接通电源。 • 将计算机背面板上的电源连接器电缆重新插好在电源插座中。 • 不使用配电盘、电源延长电缆和其它电源保护设备,以验证计算机电源 是否可以正常打开。 • 确保使用的所有配电盘都已插入电源插座且配电盘已打开。 • 使用其它设备(例如台灯)检测电源插座,确保电源插座能够正常工作。 • 确 保 主 电 源 电 缆 和 前 面 板 电 缆 已 稳 固 地 连 接 至 系 统 板 (请 参 阅 support.dell.
内存问题 警告:开始执行本节中的任何步骤之前,请阅读并遵循计算机附带的安全信 息。 如果收到内存不足的信息 — • 保存并关闭所有打开的文件,并退出所有未使用的已打开程序,以查看 是否能解决问题。 • 有关最小内存要求,请参阅软件说明文件。如有必要,请安装附加内存 (请参阅 support.dell.com 上适用于您的 《维修手册》)。 • 重置内存模块 (请参阅 support.dell.com 上适用于您的 《维修手册》) 以确保计算机可与内存正常通信。 • 运行 Dell Diagnostics (请参阅第 40 页上的 “Dell Diagnostics”)。 如果遇到其它内存问题 — • 重置内存模块 (请参阅 support.dell.com 上适用于您的 《维修手册》) 以确保计算机可与内存正常通信。 • 请确保遵循内存安装原则(请参阅 support.dell.
程序停止响应 终止程序 — 1 同时按 组合键访问 “任务管理器”。 2 单击 “应用程序”选项卡。 3 单击选择不再响应的程序,并单击 “结束任务”。 程序反复崩溃 注:大多数软件安装说明都包含在软件的说明文件中或软盘、CD、DVD 上。 查看软件说明文件 — 如果有必要,请卸载并重新安装程序。 某个程序只能用于较早的 Microsoft® Windows® 操作系统 运行程序兼容性向导 — Windows XP: 程序兼容性向导对程序进行配置,使其在类似于非 XP 操作系统的环境中运 行。 1 依次单击 “开始” → “所有程序” → “附件” → “程序兼容性向 导” → “下一步”。 2 请按照屏幕上的说明进行操作。 Windows Vista: 程序兼容性向导对程序进行配置,使其在类似于非 Windows Vista 操作系统 的环境中运行。 1 单击 “开始” → “控制面板” → “程序” → “将以前的程序与此 版本的 Windows 共同使用”。 2 在欢迎屏幕上,单击 “下一步”。 3 请按照屏幕上的说明进行操作。 出现蓝屏 关闭计算机 — 如
其它软件问题 请查看软件说明文件或与软件制造商联络,以获取故障排除信息 — • 确保程序与计算机上安装的操作系统兼容。 • 确保计算机符合运行软件所需的最低硬件要求。有关信息,请参阅软件 说明文件。 • 确保已正确安装和配置程序。 • 验证设备驱动程序是否不与程序发生冲突。 • 如果有必要,请卸载并重新安装程序。 立即备份您的文件 • 使用病毒扫描程序检查硬盘驱动器、软盘、 CD 或 DVD • 保存并关闭所有打开的文件或程序,然后通过 “开始”菜单关闭计算 机。 Dell 技术更新服务 Dell 技术更新服务为您的计算机提供了有关软件和硬件更新的主动式电子邮 件通知。此项服务是免费的,而且您可以自定义通知的内容、格式以及接收 通知的频率。 要注册 Dell 技术更新服务,请访问 support.dell.
Dell Support 公用程序是针对您的计算机环境而专门定制的。 单击、双击任务栏中的 相同。 图标或在该图标上单击鼠标右键时,其功能各不 单击 Dell Support 图标 单击 图标或在此图标上单击鼠标右键,可执行以下任务: • 检查计算机环境。 • 查看 Dell Support 公用程序设置。 • 查看 Dell Support 公用程序的帮助文件。 • 查看常见问题。 • 了解有关 Dell Support 公用程序的详细信息。 • 关闭 Dell Support 公用程序。 双击 Dell Support 图标 双击 图标可以手动检查计算机环境、查看常见问题、查看 Dell Support 公用程序的帮助文件和查看 Dell Support 设置。 有关 Dell Support 公用程序的详细信息,请单击 Dell™ Support 屏幕顶部的 问号 (?)。 46 故障排除
重新安装软件 驱动程序 识别驱动程序 如果您遇到有关设备的问题,请确定该问题是否由驱动程序引起,如果有必 要,请更新驱动程序。 Windows XP: 1 依次单击 “开始” → “控制面板”。 2 在 “选择一个类别”下,单击 “性能和维护”,然后单击 “系统”。 3 在“系统属性”窗口中,单击“硬件”选项卡,然后单击“设备管理器”。 Windows Vista: 1 单击 Windows Vista “开始”按钮 右键。 ,然后在 “计算机”上单击鼠标 2 单击 “属性” → “设备管理器”。 注: 系统可能会显示 “用户帐户控制”窗口。如果您是计算机管理员, 请单击 “继续”;否则,请与管理员联络以继续。 向下滚动列表,查看是否有设备图标上标有感叹号(带有 [!] 的黄色圆圈)。 如果设备名称旁边带有感叹号,您可能需要重新安装驱动程序或安装新的驱 动程序 (请参阅第 47 页上的 “重新安装驱动程序和公用程序”)。 重新安装驱动程序和公用程序 注意:Dell 支持 Web 站点 support.dell.
返回到设备驱动程序的先前版本 Windows XP: 1 依次单击 “开始” → “我的电脑” → “属性” → “硬件” → “设备 管理器”。 2 在安装了新驱动程序的设备上单击鼠标右键,然后单击 “属性”。 3 依次单击 “驱动程序”选项卡 → “回滚驱动程序”。 Windows Vista: 1 单击 Windows Vista “开始”按钮 右键。 ,然后在 “计算机”上单击鼠标 2 单击 “属性” → “设备管理器”。 注:系统可能会显示 “用户帐户控制”窗口。如果您是计算机管理员, 请单击 “继续”;否则,请与管理员联系以进入 “设备管理器”。 3 在安装了新驱动程序的设备上单击鼠标右键,然后单击 “属性”。 4 单击 “驱动程序”选项卡 → “回滚驱动程序”。 如果驱动程序回滚无法解决问题,请使用系统还原(请参阅第 50 页上的“还 原操作系统”)将计算机恢复至您安装新驱动程序之前的运行状态。 使用 Drivers and Utilities 介质 如果使用 “设备驱动程序回滚”或 “系统还原”(请参阅第 50 页上的 “还 原操作系统”)都不能解决问题,则请通过 Drivers a
注: Drivers and Utilities 程序仅显示随计算机安装的硬件的驱动程序。 如果您安装了其它硬件,则可能不会显示新硬件的驱动程序。如果未显 示这些驱动程序,请退出 Drivers and Utilities 程序。有关驱动程序的信 息,请参阅设备附带的说明文件。 系统将显示一则信息,说明 Resource 介质正在检测计算机硬件。 您的计算机所使用的驱动程序将自动显示在 “我的驱动程序 — ResourceCD 已检测到系统中的这些组件”窗口中。 6 单击要重新安装的驱动程序,并按照屏幕上的说明进行操作。 如果未列出某个特定驱动程序,则表明您的操作系统不需要此驱动程序。 手动重新安装驱动程序 按照上一节的说明将驱动程序文件解压缩到硬盘驱动器之后,请执行以下操 作: 1 单击 Windows Vista “开始”按钮 右键。 ,然后在 “计算机”上单击鼠标 2 单击 “属性” → “设备管理器”。 注: 系统可能会显示 “用户帐户控制”窗口。如果您是计算机管理员, 请单击 “继续”;否则,请与管理员联系以进入 “设备管理器”。 3 双击要为其安装驱动程序的设备的类型(例如,“音频”或“
还原操作系统 您可以通过以下方法还原操作系统: • Microsoft® Windows® 系统还原,使您可以将计算机恢复至先前的运行 状态而不影响数据文件。您可将系统还原功能用作还原操作系统和保存 数据文件的首选解决方案。 • Dell Factory Image Restore (仅适用于 Microsoft Windows Vista®)可 以将硬盘驱动器还原至购买计算机时它所处的运行状态。两者都将永 久删除硬盘驱动器上的所有数据,并删除您收到计算机之后所安装的 所有应用程序。仅当系统还原无法解决操作系统问题时,才可使用 Dell Factory Image Restore。 • 如果您的计算机附带了操作系统介质,则可以使用该介质还原您的操作 系统。但是,使用操作系统介质同样会删除硬盘驱动器上的所有数据。 仅当系统还原无法解决操作系统问题时,才可使用此介质。 使用 Microsoft® Windows® 系统还原 Windows 操作系统提供了系统还原功能。如果在更改硬件、软件或其它系统 设置后计算机进入不希望出现的运行状态,则该功能使您可以将计算机恢复 到先前的运行状态 (而不会影响数据文
Windows Vista: 1 单击 “开始” 。 2 在 “开始搜索”框中,键入 “系统还原”,然后按 键。 注: 系统可能会显示 “用户帐户控制”窗口。如果您是计算机管理员, 请单击 “继续”;否则,请与管理员联络以继续执行所需操作。 3 单击 “下一步”,并按照屏幕上其余的提示进行操作。 如果系统还原没有解决问题,则可以撤销上次系统还原。(请参阅第 51 页上 的 “撤销上次系统还原”。) 撤销上次系统还原 注意:撤销上次系统还原之前,请保存并关闭所有打开的文件,退出所有打 开的程序。系统还原完成之前,请勿更改、打开或删除任何文件或程序。 Windows XP: 1 依次单击 “开始” → “所有程序” → “附件” → “系统工具” → “系统还原”。 2 单击 “撤销我上次的还原”并单击 “下一步”。 Windows Vista: 1 单击 “开始” 。 2 在 “开始搜索”框中,键入 “系统还原”,然后按 键。 3 单击 “撤销我上次的还原”并单击 “下一步”。 启用系统还原 注:即使磁盘空间不足, Windows Vista 也不会禁用系统还原。因
使用 Dell Factory Image Restore 注意:使用 Dell Factory Image Restore 将永久删除硬盘驱动器上的所有数 据,以及您收到计算机之后所安装的任何应用程序或驱动程序。如果可能, 请在使用这些选项之前备份数据。仅当系统还原无法解决操作系统问题时, 才可使用 Dell Factory Image Restore。 注:在某些国家和地区或某些计算机上可能无法使用 Dell Factory Image Restore。 将 Dell Factory Image Restore (仅适用于 Microsoft Windows Vista)作为还 原操作系统的最后方法。这些选项将把您的硬盘驱动器还原至购买计算机时 它所处的运行状态。您在收到计算机之后所添加的任何程序或文件(包括数 据文件)都会从硬盘驱动器上永久删除。数据文件包括文档、电子表格、电 子邮件信息、数码照片、音乐文件等。如果可能,请在使用 Dell Factory Image Restore 之前备份所有数据。 启动 Dell Factory Image Restore 1 打开计算机。系统显示 Dell 徽标
使用操作系统介质 开始之前 如果您要重新安装 Windows 操作系统以解决新安装的驱动程序引起的问 题,请首先尝试使用 Windows 设备驱动程序回滚。请参阅第 48 页上的 “返 回到设备驱动程序的先前版本”。如果设备驱动程序回滚无法解决问题,请 使用 Microsoft Windows 系统还原将操作系统恢复至您安装新设备驱动程序 之前的运行状态。请参阅第 50 页上的 “使用 Microsoft® Windows® 系统还 原”。 注意:在执行安装之前,请备份主硬盘驱动器上的所有数据文件。对于常规 硬盘驱动器配置,主硬盘驱动器是计算机检测到的第一个驱动器。 要重新安装 Windows,您需要具备 Dell™ 操作系统介质和 Dell Drivers and Utilities 介质。 注:Dell Drivers and Utilities 介质包含计算机在组装过程中安装的驱动程 序。使用 Dell Drivers and Utilities 介质载入所有必需的驱动程序。您的计算 机可能未附带 Dell Drivers and Utilities 介质和 Dell 操作系统介质,这取决于 订购计算
重新安装软件
获得帮助 获得帮助 警告:如果您需要卸下计算机主机盖,请先断开计算机电源电缆和调制解调 器电缆与所有电源插座的连接。请遵循计算机附带的安全说明。 如果您的计算机出现问题,您可以通过完成以下步骤对问题进行诊断并解决 该问题: 1 有关您的计算机所遇到故障的信息和排除步骤,请参阅第 41 页上的 “故障排除提示”。 2 有关如何运行 Dell Diagnostics 的步骤,请参阅第 40 页上的 “Dell Diagnostics”。 3 请填写第 59 页上的 “诊断程序核对表”。 4 要获得有关安装和故障排除程序的帮助,请使用 Dell 支持 (support.dell.
技术支持和客户服务 Dell 的支持服务部门可以解答有关 Dell™ 硬件的问题。我们的支持人员使用 基于计算机的诊断程序来快速准确地解答问题。 要与 Dell 的支持服务部门联络,请先参阅第 58 页上的 “致电之前”,然后 参阅您所在地区的联络信息或访问 support.dell.com。 DellConnect™ DellConnect 是一种简单的联机访问工具,可让 Dell 服务和支持人员通过宽 带连接访问您的计算机,并在您的监督下诊断问题并进行修复。有关详情, 请访问 support.dell.com,然后单击 DellConnect。 在线服务 您可以从以下 Web 站点了解 Dell 产品和服务: www.dell.com www.dell.com/ap (仅限于亚太国家和地区) www.dell.com/jp (仅限于日本) www.euro.dell.com (仅限于欧洲) www.dell.com/la (仅限于拉丁美洲和加勒比海国家和地区) www.dell.
• Dell 市场营销部门电子邮件地址 apmarketing@dell.com (仅限于亚太国家和地区) sales_canada@dell.com (仅限于加拿大) • 匿名文件传输协议 (FTP) ftp.dell.com 使用用户名:anonymous 登录,并将您的电子邮件地址用作密码。 自动技术支持服务 Dell 的自动技术支持服务 (AutoTech) 针对 Dell 客户经常遇到的关于便携式 计算机和台式计算机的问题提供了录音解答。 当您致电自动技术时,请使用按键式电话选择与您的问题相应的主题。有关 您所在地区的电话号码,请参阅第 60 页上的 “与 Dell 联络”。 订单状态自动查询服务 要查询您订购的任何 Dell 产品的情况,您可以访问 support.dell.
退回项目以要求保修或退款 无论您是要求维修还是退款,请按以下说明准备好所有要退回的项目: 1 致电 Dell 获得退回材料授权号,并在包装箱外侧的显著位置清楚地注 明此号码。 有关您所在地区的电话号码,请参阅第 60 页上的 “与 Dell 联络”。附 上发票复印件与说明退回原因的信函。 2 附上一份诊断程序核对表(请参阅第 59 页上的“诊断程序核对表”), 其中应填写您运行过的检测和 Dell Diagnostics (请参阅第 60 页上的 “与 Dell 联络”)报告的所有错误信息。 3 如果您要求退款,请附上要退回产品的所有附件(例如电源电缆、软件 软盘和指南等)。 4 使用原来 (或同等)的包装材料包装要退回的设备。 您需要负责支付运费。同时还必须为退回的所有产品投保,并承担运送至 Dell 的过程中的损失风险。本公司不接受以货到付款 (C.O.D.
诊断程序核对表 姓名: 日期: 地址: 电话号码: 服务标签 (计算机背面或底部的条形码): 快速服务代码: 退回材料授权号 (如果 Dell 的技术支持人员已提供): 操作系统及版本: 设备: 扩充卡: 系统是否已连接至网络?是 否 网络、版本和网络适配器: 程序和版本: 请参阅操作系统说明文件,以确定系统启动文件的内容。如果计算机已连接至 打印机,请打印所有文件。否则,请在致电 Dell 之前记下每份文件的内容。 错误信息、哔声代码或诊断代码: 问题说明和已执行的故障排除步骤: 获得帮助 59
与 Dell 联络 对于美国的客户,请致电 800-WWW-DELL (800-999-3355)。 注:如果您没有激活的 Internet 连接,则可以在购货发票、装箱单、帐单或 Dell 产品目录上找到联络信息。 Dell 提供了几种联机以及电话支持和服务选项。可用性会因国家和地区以及 产品的不同而有所差异,某些服务可能在您所在的区域不可用。如果因为销 售、技术支持或客户服务问题联络 Dell,请: 1 访问 support.dell.
查找信息 注:某些功能或介质是可选的,您的计算机可能未附带这些功能或介质。某 些功能或介质可能在某些国家和地区不可用。 注:附加信息可能随您的计算机提供。 说明文件 / 介质 / 标签 目录 服务标签 / 快速服务代码 • 当您访问 support.dell.com 或与支持 人员联络时,此服务标签用于识别您的 服务标签 / 快速服务代码位于您的计算机 计算机。 上。 • 与支持人员联络时,请输入快速服务代 码以转接您的电话 注: 计算机上的服务标签 / 快速服务代 码。 Drivers and Utilities 介质 • 适用于您的计算机的诊断程序 Drivers and Utilities 介质是计算机可能 • 计算机驱动程序 注: 在 support.dell.
说明文件 / 介质 / 标签 安全、管制、保修和支持说明文件 目录 • 此类信息可能随计算机一起附送。有关 • 其它管制信息,请参阅 www.dell.com 上 • 的 “管制符合主页” ,具体位置如下: • www.dell.com/regulatory_compliance。 • • 担保信息 条款和条件 (仅限于美国) 安全说明 管制信息 人机工程学信息 最终用户许可协议 维修手册 • 如何卸下和装回部件 可 以 在 support.dell.com 上 找 到 适 用 于 • 如何配置系统设置 • 如何排除故障并解决问题 您计算机的维修手册。 《Dell 技术指南》 • 关于您的操作系统 可 从 硬 盘 驱 动 器 和 support.dell.
索引 A D 安全信息 , 7-62 Dell Factory Image Restore, 5-52 技术更新服务 , 4-45 技术支持和客户服务 , 6-56 联络 , 6-55 , 6-60 软件更新 , 4-45 Support 公用程序 , 4-45 B 保修信息 , 7-62 背面视图 , 1-9 笔记本计算机系统软件 , 7-61 哔声代码 , 4-31 Dell Diagnostics , 4-40 从 Drivers and Utilities 介质 启动 , 4-41 从硬盘驱动器启动 , 4-40 C Dell Factory Image Restore , 5-52 操作系统 产品密钥 , 7-62 Dell Factory Image Restore, 5-52 介质 , 5-53 , 7-61 系统还原 , 5-50 重新安装 , 7-61 Dell 技术指南 , 7-62 查找信息 , 7-61 电源 电源指示灯状态 , 4-42 故障排除 , 4-42 错误信息 哔声代码 , 4-31 电源指示灯 , 4-31 重新安装 驱动程序和公用程序 , 5-4
G K 更新 软件和硬件 , 4-45 快速服务代码 , 7-61 故障排除 , 4-31 , 7-62 程序崩溃 , 4-43 程序和 Windows 兼容性 , 4-44 错误信息 , 4-33 Dell Diagnostics, 4-40 电源 , 4-42 电源指示灯 , 4-31 电源指示灯状态 , 4-42 还原至先前的状态 , 5-50 计算机无响应 , 4-43 蓝屏 , 4-44 内存 , 4-43 软件 , 4-43 , 4-44 , 4-45 提示 , 4-41 管制信息 , 7-62 L 连接 IEEE 1394 设备 , 2-14 Internet, 2-15 交流适配器 , 2-13 USB 设备 , 2-14 网络 , 2-15 网络电缆 , 2-13 N 内存 故障排除 , 4-43 规格 , 3-21 Q J Internet 连接 , 2-15 设置 , 2-15 Wi-Fi Catcher 网络定位器 , 1-11 无线开关 , 1-11 计算机 规格 , 3-21 将信息传送到新计算机 , 2-17 介质 操作系统 , 7-61 Drivers and
软件 (续) 重新安装 , 5-47 S S.M.A.R.
Z 诊断程序 哔声代码 , 4-31 Dell, 4-40 电源指示灯 , 4-31 正面视图 , 1-7 支持 , 6-55 DellConnect, 6-56 地区 , 6-56 技术支持和客户服务 , 6-56 与 Dell 联络 , 6-60 在线服务 , 6-56 支持信息 , 7-62 最终用户许可协议 (EULA) , 7-62 66 索引