
Service Manual


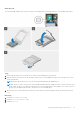
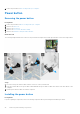


Table Of Contents
- OptiPlex 7090 Small Form Factor Service Manual
- Contents
- Working inside your computer
- Removing and installing components
- Software
- System setup
- Troubleshooting
- Getting help and contacting Dell

About this task
The following images indicate the location of the power button and provide a visual representation of the installation procedure.
Steps
1. Insert the power-button cable into the slot from the front-side of the computer, and press the power-button head until it
clicks into the place in the chassis.
2. Align and connect the power-button cable to the connector on the system board.
Next steps
1. Install the hard-drive and optical-drive bracket.
2. Install the 2.5/3.5-inch hard-drive caddy.
3. Install the front bezel.
4. Install the side cover.
5. Follow the procedure in after working inside your computer.
Power-supply unit
Removing the power-supply unit
Prerequisites
1. Follow the procedure in before working inside your computer.
2. Remove the side cover.
3. Remove the 2.5-inch hard-drive assembly.
4. Remove the hard-drive and optical-drive bracket.
Removing and installing components
49