
Service Manual


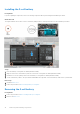
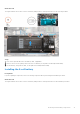

Table Of Contents
- Inspiron 15 5509 Service Manual
- Contents
- Working inside your computer
- Removing and installing components
- Recommended tools
- Screw list
- Major components of Inspiron 15 5509
- Base cover
- Battery
- Memory module
- Solid-state drive—M.2 slot one
- Solid-state drive—M.2 slot two
- Wireless card
- Fan
- Coin-cell battery
- Heat sink
- Display assembly
- Power-adapter port
- Speakers
- Power button with optional fingerprint reader
- Touchpad
- I/O board
- System board
- Palm-rest and keyboard assembly
- Drivers and downloads
- System setup
- Troubleshooting
- Getting help and contacting Dell

Steps
1. Loosen the two captive screws (M2x7.5) that secure the base cover to the palm-rest and keyboard assembly.
2. Remove the seven screws (M2x4) that secure the base cover to the palm-rest and keyboard assembly.
3. Using a plastic scribe, pry the base cover starting from the recess at the display hinge and work your way around the sides
to remove the base cover.
4. Lift the base cover off the palm-rest and keyboard assembly.
5. Peel the tape and disconnect the battery cable from the system board.
NOTE: Disconnect the battery cable only when you are continuing to remove other components from your computer.
6. Press and hold the power button for five seconds to ground the computer and drain the flea power.
Installing the base cover
Prerequisites
If you are replacing a component, remove the existing component before performing the installation procedure.
About this task
The figure indicates the location of the base cover and provides a visual representation of the installation procedure.
14
Removing and installing components