
Owners Manual


PS6000 Hardware Maintenance Maintaining Control Modules
3–13
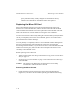
Figure 3-7: Installing a Control Module
5. Connect the network cables as described in Connecting Network Cables on
page 3-6.
6. If the array was shut down, turn on power to the array.
7. Examine the LEDs, as described in Interpreting Control Module LEDs on
page 3-2. Also, check the GUI Member Controllers window or run the CLI
member select show controllers command. The control module
status will be either
active (if there is only one control module) or
secondary.
If two control modules are installed but only one appears in the GUI or CLI, the
control module may not be properly installed. Re-install the control module. If
both control modules still do not appear in the GUI or CLI, they may not be
running the same firmware. Contact your array support provider.
Note: When connected, a control module cache battery may begin to charge. If
the low-battery-safe cache policy is enabled (the default), the array will
operate in write-through mode until the cache battery is fully charged.
However, if you need optimal performance before the battery is fully
charged, as soon as the battery status is
good/charging, you can
temporarily disable the low-battery-safe policy and force the array to
operate in write-back mode. Make sure to re-enable the low-battery-safe