
Install Guide


Installation and Setup Installing a PS6000 Array
2–7
Optionally, you can also use an uninterruptible power supply system (UPS) to
provide a highly available source of power to an array. Each UPS (not included)
should be on a different circuit and must provide the correct type of voltage for an
adequate amount of time.
Rack Mount Requirements
Mount the PS6000 array in a standard, 19 inch rack, according to the following
requirements:
• Mount the array in a horizontal position. Failure to do so will void your array
warranty and support contract.
• Attach the rack to the floor for added stability.
• Support the array until it is completely mounted in the rack.
The rail assembly kit supplied in the array shipping box includes installation and
mounting instructions.
Installing the Hardware
Make sure you complete the preliminary tasks described in Before You Begin on
page 2-4 Then, follow these steps to install a PS6000 array:
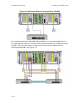
1. Connect the power cables. Do not turn on power to the array at this time. See
Step 1: Connect the Array to Power on page 2-8.
Table 2-4: Required Hardware – Not Supplied
Component Description
Standard 19 in. four-
pole rack
Provides easy access to arrays and other hardware in your
computing environment.
Two to eight network
cables
Connects an array to a network switch. Use Category 5E or
Category 6 cables with RJ45 connectors. Use Category 5 cables
only if they adhere to the TIA/EIA TSB95 standard.
Connect at least one port on each control module to the network
switch.
Network switch Connects devices to a network. Multiple switches are
recommended.