
Owners Manual


PS4210 Hardware Owner's Manual
3 Maintaining Control Modules
Shipping Requirements
If you plan to move a previously installed array geographically, for safety reasons, discharge the battery to a
lower charge level. To discharge the battery, shut down the array using the halt -b command. This command
also places the smart battery into ship mode, which minimizes further charge loss while in storage/transport.
When you reinstall the array, on first power up, there will be a delay of up to 20 minutes while the batteries
charge back up to 100 percent.
Before You Begin
1. Ensure that the control module that you are going to be replacing the battery on is in secondary mode. If it is
active, fail the control module over so that it becomes the secondary one.
To make the control module secondary:
a. Click Group.
b. Expand Members and select the member name.
c. Click the Controllers tab to display the status of the control module.
d. Click the Maintenance tab, and click restart.
2. If applicable, label the network cables on the secondary control module so that you can reinstall them
correctly later.
Remove the Battery
1. Disconnect the network cables from the secondary control module.
2. Remove the secondary control module and place it on a static-safe work area with the battery cover facing
up.
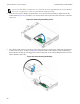
3. The battery cover, which holds the battery and related electronics, is held in place by a single screw. This
screw is not captive. Loosen the screw using a Phillips #2 screwdriver (Figure 22), remove the screw from
the hole, and set it aside.
Figure 22: Removing the Screw From the Battery Cover
27