
Owners Manual


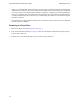


Table Of Contents
- 1 Basic Storage Array Information
- 2 Maintaining Drives
- 3 Maintaining Control Modules
- Control Module Features
- Replacing a Control Module
- Replacing the MicroSD Card
- Advanced Networking Options
- 4 Maintaining Power Supply and Cooling Modules
- 5 Troubleshooting Your Array
- Safety First—For You and Your array
- Obtaining Technical Support and Customer Service
- Determining Service Tag Information
- Obtaining Component Diagnostics
- Troubleshooting Array Startup Failure
- Troubleshooting Loss of Communication
- Troubleshooting Array Connections
- Troubleshooting External Connections
- Troubleshooting Power Supply and Cooling Modules
- Troubleshooting Array Cooling Problems
- Troubleshooting Control Modules
- Troubleshooting Hard Drives
- Index

PS4100 Hardware Maintenance Guide Maintaining Drives
10
• There is a two-minute delay between the time you insert a drive and the time the drive is automatically
configured into a RAID set. This time interval allows multiple drives to be simultaneously configured
in an array, which is more efficient than installing a single drive, configuring it, and then repeating the
process. For example, when you install a drive, the timer starts. If no other drives are installed, the drive
is configured after a delay of two minutes. If you install another drive before two minutes have elapsed,
the timer is restarted.
• If you install a drive during RAID reconstruction or verification, the new drive will not be configured
until the operation completes.
Removing a 2.5-inch Drive
1. Remove the bezel. See Removing the Bezel on page 2.
2. Press the release button (callout 1 in Figure 8). The drive latch opens and the drive emerges partway
from the array (callout 2).
3. Pull the drive out by the handle until it is free of the drive bay (callout 3).