
White Papers


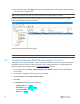

Table Of Contents
- 1 Zero-Touch Overview
- 2 Introduction
- 2.1 Interactions between components in Auto Config architecture
- 2.2 DHCP provisioning options
- 2.3 DHCP—current and new configuration options
- 2.4 Prerequisites for enabling Auto Config
- 2.5 iDRAC interfaces to enable Auto Config
- 2.5.1 Enabling Auto Config using RACADM (local or remote)
- 2.5.2 Enabling Auto Config using Redfish
- 2.5.3 Enabling Auto Config using iDRAC UI
- 2.6 Using Auto Config in an IPv6 Network
- 2.7 Server Configuration Profiles
- 3 Performing Firmware Repository Update During Auto Config
- 4 Performing Operating System Deployment During Auto Config
- 5 Configuring Windows and Linux DHCP servers to support Auto Config
- 5.1 Auto Config Server Configuration Profile String Format for DHCP Option 43 and DHCPv6 Option 17
- 5.2 Configuring Windows DHCP server option 43
- 5.3 Configuring Windows DHCP server option 60
- 5.4 Configuring Windows DHCPv6 server options 16 and 17
- 5.5 Configuring a Linux DHCP server
- 5.6 Configuring a Linux DHCPv6 Server
- 6 File naming behavior with iDRAC Auto Config
- 7 Workflow Examples
- 8 Troubleshooting Auto Config issues
- 9 Conclusion
- A Technical support and resources

28
Figure 20 Windows DHCP Set Predefined Option.
10. Click OK to return to the DHCP console.
11. Expand all items under the server name on the DHCP console.
12. Right-click Scope Options and select Configure Options.
13. Click Advanced.
14. From the Vendor class drop-down menu, select iDRAC.
15. Select the 060 iDRAC check box under Available Options.
Under Data entry, type the string value that is sent to the iDRAC to pull the correct Server
Configuration Profile file to import. The list of required and optional parameters for this string can be
found in section 6.1.
Figure 21 Setting iDRAC as the Vendor Class.