
User's Manual


Using Resource Instances
Inventory Management 5-25
Modifying Core Properties for Resource Instances
The information in the core properties section provides a basic description of the resource instance.
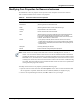
Table 5-6 lists the default resource instance core properties.
Table 5-6 Resource Instance Core Properties
Property Name Property Description
Name Name of the resource.
Manufacturer (Read-only) Resource manufacturer name.
Model (Read-only) Model number or name of the resource type.
Asset tag Unique identifier for the resource model.
Version Version number for the resource hardware.
Role (Read-only) Role of a resource created from this model-managed resource;
or for an Active System Manager control resource, such as a Virtual,
Component, Hub, Managed Equipment, Matrix Switch, Patch Panel, Power
Controller, Terminal Server, or TFTP Server.
Shared • If this property is selected, then the resource instance can be used in
multiple sessions simultaneously, as long as it has interface ports available.
• If this property is not selected, the resource instance can only belong to one
session at a time.
Description Text string describing this resource.
Domain Domain name that manages that piece of equipment.
Note Virtual resources are usually hosted within other resources called Hypervisors, or hosts, or
clouds—in a more abstract manner. Host resources can also be modeled and must be modeled to
schedule and realize those virtual resources. Examples of possible host resources would be Vmware
ESX/ESXi servers, CitrixXen Servers, Amazon Cloud, Rackspace Cloud. Those resources can be
of managed or control roles, but the associated resource instance must have their virtualization flag
set to true. This setting indicates to the scheduler that those resources are the ones responsible for
creating and destroying virtual resources.
To modify resource instance core properties, perform the following steps:
1. Open the resource instance and select the Core Properties section. Enter as much information about
the core properties as possible. Fields that cannot be modified (disabled) are displayed in gray.
2. On the Active System Manager menu bar, click File > Save to save your changes.