
Installation Guide


GENERAL & INSTALLATION INSTRUCTIONS 2G+5G (RT)
Name Date modified/printed File Doc.no Rev. Page
Svante BERNOW 14-04-30/ 14-04-30 2G+5G [Doc.no] 080908 8(9)
Disassembling (without tool)
Your floor can very easy be disassembled, which enables replacement during installation and also during use.
Disassembling with Välinge Release Tool
Special installations
Small panel widths
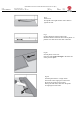
Joining at short ends length cut panels.
Cut the tongue at the same time you cut the length of the panel and install as shown above.
Please note that the smallest width of a panel is ca 50 mm at the last row – if not - first row must be
adjusted.
This can easily be calculated when measuring the room with before installation!
Horizontal installation
Cut off the locking element with a chisel, push the planks horizontally together.
If necessary, place some distances between the last panel and the wall to keep the planks
together during the curing time of the glue
Fig 13.
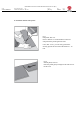
Separate the whole row by carefully lifting up
and slightly knocking just above the joint.
Fold up and release the whole long side.
Fig 12.
Disassemble the panels by sliding
horizontally.
(Do not fold up!)