Location & How It Works ES TT meme Location Selecting a Location RECREANT 1. Dehumidifier ast be berated 1a 40 Gris dea 1s be Most effective, Cline a cads, lobar outdid openings © the rom, The effectiveness of the demurring pends or Hie fats a which new moist Jed ai eaters La worm, 2. Pace dehumidifier in 2 location (at does nat restock aio ros the fort of tae nt of cut 1 1 less on [he lel ide of cob 3.
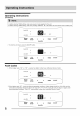
Operating Instructions Operating Instructions Allow the unit to reach room temperature before operating. To begin operating the dehumidifier, follow these steps: % bore: UAE st bs upright for a hr prt ta operating £. Plug the power cord int a proper grouse 115 volt AC outlet L none 1 the "BUCKET FULL" light is on, remove the bucket and re-install to reset the float switch. N ache of) coon fer BER Ran RESET SPEED ¢ A THEE DONOR hy 2. Ta turn the wnt on, press the ON/OFF button.
Operating Instructions Operating Instructions (continued) 3. After a few days whee the fixative Humidity has dinned, press the HUMIDITY A or ¥ buttons a choose a value tree 35% to 85%, 50 the room is kept at comfortable hry.
Operating Instructions Operating Instructions (continued) EL wor: 2. 7% sho the unit pet w unsure “Tame mw — west seo A Ter nor diy Co va, press the ONION baton a I be pit confer Her TER wore aridity Before entering TIMER sting, male sure power is bung supplied to she uni, Before an taring TIMER setting, make sure pressing HUMIDITY A or V button chats one desired room humidity fest. Fault Codes 1.1 the display reds "AS" or p— *, cursor has sifted.
Operating Instructions Removing Collected Water ©. Emptying the Buck a. When the buck is full, the nit will shay don and tha BUCKET FULL incarnate will illuminate. can fer RESET SPEED v A THEE GRUFF b. Do not move the unt at tis time otherwise water sy spit on the Oar €. Press sites of bucket gently fo punchy the buck from the uni. Remove the bucket ws shown i the autographs below and empty he bucket. A wane signboard water from bucket. Water is not potable and cannot be used far drinking.
Operating Instructions, Care and Cleaning & Storage Removing Collected Water (continued) 2. Continuous Drainage: a. For continuous drainage operation, you will nest a garden hose and 3 drain nearby to discharge the water into. i. Ensure the Ura cap on the back side of the uni. {110.1} ©. insert the female remade end of he hose art We drain connector of the ut {fig 2) ce Screw the garden hose onto the threaded portion of the drain connector. &. take SUSE the otiose is sere So there are no leaks. #.
Major Appliance Limiter Warranty our appliance i warranted by Crowley. Mosley has authorized Electron: and their authorized services to perform sarnie under this warranty, Crowley authorizes 00 one else to change or ack] 0 any of these oblations under his warranty.