Operator’s Manual 2-Cycle MINI-TILLER & CULTIVATOR With Edger Attachment Model No. 316.29256 CAUTION: Before using this product, read this manual and follow all safety rules and operating instructions. Español, p. 19 Sears, Roebuck and Co., Hoffman Estates, IL 60179, U.S.A. Visit our website: www.sears.
INTRODUCTION Operating Instructions . . . . . . . . . . . . . . . . . . . . . .11 TABLE OF CONTENTS Warranty . . . . . . . . . . . . . . . . . . . . . . . . . . . . . . . . .2 Service Information . . . . . . . . . . . . . . . . . . . . . . . . .2 Rules for Safe Operation . . . . . . . . . . . . . . . . . . . . .3 Know Your Unit . . . . . . . . . . . . . . . . . . . . . . . . . . . .6 Assembly Instructions . . . . . . . . . . . . . . . . . . . . . . .7 Oil and Fuel Information . . . . . . . . . . . . . . .
RULES FOR SAFE OPERATION The purpose of safety symbols is to attract your attention to possible dangers. The safety symbols, and their explanations, deserve your careful attention and understanding. The safety warnings do not by themselves eliminate any danger. The instructions or warnings they give are not substitutes for proper accident prevention measures. SYMBOL MEANING Indicates danger, warning or caution. Attention is required in order to avoid serious personal injury.
RULES FOR SAFE OPERATION • Always stop the engine and allow it to cool before filling the fuel tank. Never remove the cap of the fuel tank, or add fuel, when the engine is hot. Never operate the unit without the fuel cap securely in place. Loosen the fuel tank cap slowly to relieve any pressure in the tank. • Mix and add fuel in a clean, well-ventilated outdoor area where there are no sparks or flames. Slowly remove the fuel cap only after stopping engine. Do not smoke while fueling or mixing fuel.
RULES FOR SAFE OPERATION SAFETY AND INTERNATIONAL SYMBOLS This operator's manual describes safety and international symbols and pictographs that may appear on this product. Read the operator's manual for complete safety, assembly, operating and maintenance and repair information. SYMBOL MEANING • SAFETY ALERT SYMBOL Indicates danger, warning, or caution. May be used in conjunction with other symbols or pictographs.
KNOW YOUR PRODUCT Applications • Cultivating sod and light to medium soil • Cultivating in garden areas, around trees, etc.
ASSEMBLY INSTRUCTIONS ASSEMBLING THE UNIT Before operating, position the unit’s handlebars. NOTE: You may also need to reposition the roller height before using the cultivator. Refer to the Adjusting Tine Depth section. Washer Hole Handlebar Knob Bolt Begin by carefully unpacking the contents and making sure that nothing is damaged. Handlebars POSITIONING THE HANDLEBARS 1. Loosen the two knobs on the inside of the handlebars (Fig. 1). 2.
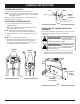
ASSEMBLY INSTRUCTIONS 2. Install a carriage bolt through each of the slotted holes in the roller bracket and into the tine guard. 3. On the TOP side of the tine guard, install a lock washer and a wing nut onto each of the bolts (Fig. 3). 4. Make sure the square shoulder of the bolts is pushed through the slotted holes in the roller bracket. Tighten the wing nuts (Fig. 4). Up NOTE: Do not over-tighten the wing nuts. Loosen the wing nuts to adjust roller height. Down Fig.
OIL AND FUEL INFORMATION OIL AND FUEL MIXING INSTRUCTIONS FUEL MIXTURE TABLE Old and/or improperly mixed fuel are the main reasons for the unit not running properly. Be sure to use fresh, clean unleaded fuel. Follow the instructions carefully for the proper fuel/oil mixture. + Definition of Blended Fuels Today's fuels are often a blend of gasoline and oxygenates such as ethanol, methanol, or MTBE (ether). Alcohol-blended fuel absorbs water.
STARTING/STOPPING INSTRUCTIONS Operate this unit only in a well- ventilated outdoor area. Carbon monoxide exhaust fumes can be lethal in a confined area. WARNING: OFF (O) Avoid accidental starting. Make sure you are in the starting position when pulling the starter rope (Fig. 10). To avoid serious injury, the operator and unit must be in a stable position while starting. WARNING: ON (I) Throttle Control Fig. 8 STARTING INSTRUCTIONS 1. Mix gas with oil. Fill fuel tank with fuel/oil mixture.
OPERATING INSTRUCTIONS OPERATING TIPS Dress properly to reduce the risk of injury when operating this unit. Do not wear loose clothing or jewelry. Wear eye and ear/hearing protection. Wear heavy long pants, boots and gloves. Do not wear short pants, sandals or operate barefoot. WARNING: 1. Move the cultivator to the work area prior to starting the engine. Transport the cultivator by pushing it on its roller wheel or by carrying it by the transport grip.
MAINTENANCE AND REPAIR INSTRUCTIONS MAINTENANCE SCHEDULE Perform these required maintenance procedures at the frequency stated in the table. These procedures should also be a part of any seasonal tune-up. NOTE: Some maintenance procedures may require special tools or skills. If you are unsure about these procedures, take your unit to a Sears Parts & Repair center or other qualified service dealer. To prevent serious injury, never perform maintenance or repairs with unit running.
MAINTENANCE AND REPAIR INSTRUCTIONS AIR FILTER MAINTENANCE Removing the Air Filter/Muffler Cover To avoid serious personal injury, always turn the unit off and allow it to cool before you clean or service it. WARNING: 1. Remove the four (4) screws securing the air filter/muffler cover (Fig. 13). Use a flat blade or # T20 Torx bit screwdriver. 2. Pull the cover from the engine. Do not force. EZ Fire™ Lever Air Filter Inside Muffler Cover Fig. 14 Screws Screws Fig. 15 Fig.
MAINTENANCE AND REPAIR INSTRUCTIONS 8. Place the muffler (with the exhaust gasket in place and bolts inserted), against the engine, aligning the bolt holes. Tighten the bolts to secure the muffler to the engine. If using a torque wrench, torque to: 80-90 in.•lb. (9-10.2 N•m) 9. Reinstall the air filter/muffler cover. If the muffler is not tightened securely, it could fall off causing damage to the unit and possible serious personal injury.
MAINTENANCE AND REPAIR INSTRUCTIONS REPLACING THE SPARK PLUG LONG TERM STORAGE Use a Champion RDJ-7Y spark plug. The correct air gap is 0.020 in. (0.5 mm). Remove the plug after every 25 hours of operation and check its condition. 1. Stop the engine and allow it to cool. Grasp the plug wire firmly and pull the cap from the spark plug. 2. Clean dirt from around the spark plug. Remove the spark plug from the cylinder head by turning a 5/8 in. socket counterclockwise. 3.
TROUBLESHOOTING ENGINE WILL NOT START CAUSE ACTION Empty fuel tank Fill fuel tank with new fuel Primer bulb wasn't pressed enough Press primer bulb fully and slowly 10 times Engine is flooded Squeeze the trigger and pull the starter rope Old fuel Drain gas tank and add fresh fuel Fouled spark plug Replace or clean the spark plug Plugged spark arrestor Clean or replace spark arrestor EZ Fire lever wasn’t flipped/set Move lever to the starting position The outside temperature is below 40º F P
SPECIFICATIONS ENGINE* Engine Type........................................................................................................................................... Air-Cooled, 2-Cycle Displacement .............................................................................................................................................................. 31 cc Idle Speed RPM .............................................................................................................................
EPA Emission Control Warranty Statement Your Warranty Rights and Obligations The Environmental Protection Agency and Sears are pleased to explain the emission control system warranty on your 2002 and later small off-road engine. New small off-road engines must be designed, built and equipped to meet stringent anti-smog standards.
INTRODUCCION INDICE DE CONTENIDOS Garantía . . . . . . . . . . . . . . . . . . . . . . . . . . . . . . . . . 19 Llamadas a apoyo al cliente . . . . . . . . . . . . . . . . . 19 Normas para una operación segura . . . . . . . . . . . 20 Conozca su unidad . . . . . . . . . . . . . . . . . . . . . . . . 23 Instrucciones de ensamble . . . . . . . . . . . . . . . . . . 24 Información del aceite y del combustible . . . . . . . 26 Instrucciones de arranque y apagado . . . . . . . . . .
NORMAS PARA UNA OPERACION SEGURA Los símbolos de seguridad se utilizan para llamar su atención sobre posibles peligros. Los símbolos de seguridad y sus explicaciones merecen toda su atención y comprensión. Los símbolos de seguridad no eliminan ningún peligro por sí mismos. Las instrucciones o advertencias que ofrecen no substituyen las medidas adecuadas de prevención de accidentes.
NORMAS PARA UNA OPERACION SEGURA • Mezcle y cargue el combustible en un área exterior bien ventilada donde no haya chispas ni llamas. Quite lentamente la tapa del combustible sólo después de apagar el motor. No fume mientras carga o mezcla el combustible. Limpie de inmediato todo el combustible que se haya derramado. • Aleje la unidad a por lo menos 9,1 m (30 pies) del lugar de carga de combustible antes de arrancar el motor.
NORMAS PARA UNA OPERACION SEGURA SIMBOLOS DE SEGURIDAD DE INTERCACIONALES Este manual del operador describe los símbolos y figuras de seguridad e internacionales que pueden aparecer en este producto. Lea el manual del operador para obtener información completa acerca de la seguridad, ensamble, operación y mantenimiento y reparación. SIMBOLO SIGNIFICADO • SIMBOLO DE ALERTA DE SEGURIDAD IIndica peligro, advertencia o precaución. Puede ser utilizado junto con otros símbolos o figuras.
CONOZCA SU UNIDAD APLICACION Use esta unidad para cultivar tierra herbosa y tierra negra ligera a mediana. También se utiliza para cultivar áreas de jardines, alrededor de árboles, etc.
INSTRUCCIONES DE ENSAMBLE ENSAMBLE DE LA UNIDAD Su cultivador para jardines ha sido completamente ensamblado. El manubrio deberá colocarse en la posición adecuada antes de la operación. NOTA: Antes de su operación, es posible que deba cambiar la posición de la altura de la rueda. Lea Ajuste de la Profundidad de las Púas. Desembale con cuidado el contenido y verifique que no haya piezas dañadas. Arandela Orificio Perilla del manubrio Perno Manubrio COLOCACION DEL MANUBRIO Fig. 2 1.
INSTRUCCIONES DE ENSAMBLE 2. Instale un perno de carro a través de cada uno de los orificios ranurados del soporte de la rueda y en la protección de las púas. 3. Instale una arandela de seguridad y una tuerca de mariposa en cada uno de los pernos de la parte superior de la protección de las púas (Fig. 3). 4. Verifique que el hombro cuadrado de los pernos haya atravesado los orificios ranurados del soporte de la rueda. Ajuste las tuercas de mariposa (Fig. 4).
INFORMACION DEL ACEITE Y DEL COMBUSTIBLE INSTRUCCIONES PARA MEZCLAR EL ACEITE Y EL COMBUSTIBLE El combustible viejo o mal mezclado son los motivos principales del mal funcionamiento de la unidad. Asegúrese de usar combustible nuevo, limpio y sin plomo. Siga las instrucciones en detalle para mezclar correctamente el aceite y el combustible.
INSTRUCCIONES DE ARRANQUE Y APAGADO Use esta unidad sólo en un área exterior bien ventilada. Los gases de escape de monóxido de carbono pueden ser letales en un área cerrada. ADVERTENCIA: Parado/ Apagado (O) Evite los arranques accidentales. Colóquese en posición de inicio cuando tire de la cuerda de arranque (Fig. 10). El operador y la unidad deben estar en una posición estable al arrancar la unidad para evitar graves lesiones personales. ADVERTENCIA: INSTRUCCIONES DE ARRANQUE 1.
INSTRUCCIONES DE OPERACION CONSEJOS PARA LA OPERACION en ADVERTENCIA: Vista forma adecuada para reducir el riesgo de lesiones cuando opere esta unidad. No use ropa holgada ni alhajas. Use protección ocular y auditiva. Use pantalones largos y gruesos, botas y guantes. No use pantalones cortos, sandalias ni trabaje descalzo. 1. Transporte el cultivador hacia el área de trabajo antes de arrancar el motor. Puede transportar el cultivador empujándolo sobre ruedas.
INSTRUCCIONES DE MANTENIMIENTO Y REPARACION NOTA: Algunos procedimientos de mantenimiento pueden requerir el uso de herramientas o habilidades especiales. Si no está seguro acerca de estos procedimientos, lleve su unidad a un establecimiento de reparación, persona o distribuidor de servicio autorizado de Sears que arregle motores para uso fuera de la carretera. PROGRAMA DE MANTENIMIENTO Estos procedimientos requeridos para el mantenimiento deben ser realizados con la frecuencia indicada en la tabla.
INSTRUCCIONES DE MANTENIMIENTO Y REPARACION MANTENIMIENTO DEL FILTRO DE AIRE evitar ADVERTENCIA: Para graves lesiones personales, apague siempre su recortador y espere que se enfríe antes de limpiarlo o realizar todo tipo de mantenimiento. Remoción de la cubierta del silenciador / filtro de aire 1. Saque los cuatro (4) tornillos que sostienen la cubierta del silenciador / filtro de aire (Fig. 13). Use un destornillador de vástago plano o de broca Torx N° T20. 2. Saque la cubierta del motor. No la fuerce.
INSTRUCCIONES DE MANTENIMIENTO Y REPARACION 8. Ponga el silenciador con la junta en su lugar y los pernos insertados contra el motor, alineando los orificios de los pernos. Apriete los pernos contra el motor, para asegurar el silenciador. Si usa una llave de torsión, ajuste a: 80-90 pulg.•libras (9-10.2 N•m). 9. Reinstale la tapa del filtro de aire / silenciador. el ADVERTENCIA: Sisilenciador no se aprieta fijamente se puede caer y causarle daño a la unidad y posibles lesiones personales graves.
INSTRUCCIONES DE MANTENIMIENTO Y REPARACION CAMBIO DE LA BUJIA DE ENCENDIDO Use una bujía de encendido Champion RDJ7Y (o similar). La separación correcta es de 0.020 pulgadas (0.5 mm). Retire la bujía luego de cada 50 horas de operación e inspeccione su estado. 1. Apague el motor y espere que se enfríe. Tome el alambre de la bujía con firmeza y sáquelo de la bujía de encendido. 2. Limpie alrededor de la bujía de encendido.
RESOLUCION DE PROBLEMAS EL MOTOR NO ARRANCA CAUSA El tanque de combustible está vacío La bombilla de cebado no fue oprimida lo suficiente El motor está inundado El combustible es viejo o está mal mezclado La bujía de encendido está arruinada Parachispas obstruido La palanca EZ Fire™ no estaba en la posición correcta La temperatura exterior es por debajo de 4º C (40º F) La temperatura exterior es de más de 32º C (90º F) ACCIÓN Llene el tanque con combustible bien mezclado Oprima la bombilla de cebado total
ESPECIFICACIONES MOTOR* Tipo de motor......................................................................................................................... Enfriado por aire, de 2 ciclos Desplazamiento ........................................................................................................................................ 31 cm3 (1,9 pulg3) R.P.M. de velocidad mínima ................................................................................................................ 2.600 - 3.
PARTS LIST ENGINE PARTS: MODEL MINI-TILLER EDGER 2-CYCLE GAS 3 37 16 4 15 5 14 9 33 34 2 1 3 35 11 6 18 7 8 49 10 36 19 17 12 20 13 47 45 37 23 48 24 46 38 27 25 21 42 26 28 29 30 39 44 43 41 31 50 Item Part No.
PARTS LIST 1 CULTIVATOR AND BOOM PARTS 2-CYCLE GAS 4 3 4 2 3 35 1 11 7 5 12 6 8 16 18 13 14 Item 1 2 3 4 5 6 7 8 9 10 11 12 13 14 15 16 17 18 19 20 21 22 23 24 25 26 27 28 29 30 31 32 33 34 35 Part No.
Declaración de Garantía de Control de Emisiones de la EPA Sus Derechos y Obligaciones de la Garantía La Agencia de Protección Ambiental y Sears se complacen en explicar la garantía del sistema de control de emisiones para su pequeño motor para uso fuera de la carretera del 2002 y posterior. Los nuevos motores pequeños para uso fuera de la carretera tienen que diseñarse, construirse y equiparse para cumplir las normas contra smog más estrictas.
NOTES 38
Repair Protection Agreements Convenios de Cobertura de Gastos para Reparaciones Congratulations on making a smart purchase. Your new Craftsman® product is designed and manufactured for years of dependable operation. But like all products, it may require repair from time to time. That’s when having a Repair Protection Agreement can save you money and aggravation. Felicidades por haber hecho una compra inteligente.
Get it fixed, at your home or ours! Your Home For repair – in your home – of all major brand appliances, lawn and garden equipment, or heating and cooling systems, no matter who made it, no matter who sold it! For the replacement parts, accessories and owner’s manuals that you need to do-it-yourself. For Sears professional installation of home appliances and items like garage door openers and water heaters. 1-800-4-MY-HOME® (1-800-469-4663) Call anytime, day or night (U.S.A. and Canada) www.sears.