
User Guide User guide


Bria Android Edition User Guide
3
2 Configuring Bria Android Edition
We strongly recommend that you perform your initial setup from within a “known” network, such as in
your enterprise or university campus Wi-Fi zone or within range of your home network (if you have
one) and not in a network such as an internet cafe.
2.1 Getting Ready
Obtain Account Information from your VoIP Service Provider
• Your username, password and domain.
• Your voicemail number, if your service provider provides this service.
Set up your Wi-Fi and 3G Connection
Make sure Wi-Fi is set up, 3G is enabled and data is enabled in your device.
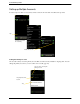
1. From the main Android screen, tap Settings > Wireless & networks.
2. Look at the Wi-Fi field:
• If it has a checkmark and a message such as “Connected to MyEnterprise”, then your phone has a Wi-
Fi connection. Go to “Set up your 3G Connection”, below.
• If it has no checkmark and the line “Turn on Wi-Fi”, then tap the field to turn on Wi-Fi and wait for the
message “Connected to MyEnterprise”
• If the message does not appear, tap Wi-Fi settings (the next field). On the Wi-Fi settings screen, tap the
desired network and complete the popup that appears. The message “Connected” will appear.
You can connect to as many networks as you want. Whenever you move into range of one of these
networks (and assuming you are not already connected elsewhere), you will automatically connect to
that network.
Set up your 3G Connection
1. From the main Android screen, tap Settings > Wireless & networks.
2. Scroll down and tap Mobile networks.
3. On the Mobile networks screen, make sure:
• Data enabled is On
• Use only 2G networks is Off (in order to enable 3G).
Indicates that there is a Wireless connection