Digital soldering station Model 96531 Set up And Operating Instructions Diagrams within this manual may not be drawn proportionally. Due to continuing improvements, actual product may differ slightly from the product described herein. Distributed Exclusively by Harbor Freight Tools 3491 Mission Oaks Blvd., Camarillo, CA 93011 Visit our website at: http://www.harborfreight.com Read this material before using this product. Failure to do so can result in serious injury. Save this manual.
Contents Important SAFETY Information............................. 3 General Safety Rules.................................................. 3 Work Area....................................................................................4 Electrical Safety..........................................................................4 Personal Safety...........................................................................4 Tool Use and Care.......................................................................
Save This Manual Keep this manual for the safety warnings and precautions, assembly, operating, inspection, maintenance and cleaning procedures. Write the product’s serial number in the back of the manual near the assembly diagram (or month and year of purchase if product has no number). Keep this manual and the receipt in a safe and dry place for future reference.
General Safety Rules WARNING! Read all instructions Failure to follow all instructions listed below may result in electric shock, fire, and/or serious injury. The term “power tool” in all of the warnings listed below refers to your mains-operated (corded) power tool or battery-operated (cordless) power tool. SAVE THESE INSTRUCTIONS 1. Work area safety a. Keep work area clean and well lit. Cluttered or dark areas invite accidents. b.
b. Use safety equipment. Always wear eye protection. Safety equipment such as dust mask, non-skid safety shoes, heavy-duty work gloves, hard hat, or hearing protection used for appropriate conditions will reduce personal injuries. c. Avoid accidental starting. Ensure the switch is in the off-position before plugging in. Carrying power tools with your finger on the switch or plugging in power tools that have the switch on invites accidents. d. Do not overreach. Keep proper footing and balance at all times.
Specific Safety Rules 1. Maintain labels and nameplates on the tool. These carry important safety information. If unreadable or missing, contact Harbor Freight Tools for a replacement. 2. Avoid unintentional starting. Prepare to begin work before turning on the tool. 3. Do not leave the tool unattended when it is plugged into an electrical outlet. Turn off the tool, and unplug it from its electrical outlet before leaving. Make sure soldering wire is not connected to tool that is plugged in. 4.
before use. If the plug will not fit the outlet, have a proper outlet installed by a qualified electrician. Grounded Tools: Tools with Three Prong Plugs 1. Tools marked with “Grounding Required” have a three wire cord and three prong grounding plug. The plug must be connected to a properly grounded outlet. If the tool should electrically malfunction or break down, grounding provides a low resistance path to carry electricity away from the user, reducing the risk of electric shock.
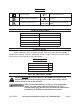
2. As the distance from the supply outlet increases, you must use a heavier gauge extension cord. Using extension cords with inadequately sized wire causes a serious drop in voltage, resulting in loss of power and possible tool damage. (See Table A.) 3. The smaller the gauge number of the wire, the greater the capacity of the cord. For example, a 14 gauge cord can carry a higher current than a 16 gauge cord. (See Table A.) 4.
Symbology V~ A Double Insulated Canadian Standards Association Volts Alternating Current Amperes No Load Revolutions per Minute n0 xxxx/min. (RPM) Underwriters Laboratories, Inc. Specifications Electrical Requirements 120 V~ / 60 Hz, .5 Amps Power Consumption 60 Watt Temperature Range 150º~450ºC, 300º~840ºF Power Cord 18 AWG X 3C Fuse 6.3A/250V Weight 5.1 Pounds Unpacking When unpacking, check to make sure that the item is intact and undamaged.
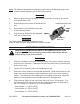
Note: For additional information regarding the parts listed in the following pages, refer to the Assembly Diagram near the end of this manual. Assembly 1. Match up holes in Plug (27) to pins in Cord Connection (6), plug in, and secure with Cord Retainer (26). 2. Place Sponge in the bottom of the handle rest unit. 3. Set up handle rest unit within easy reach of the Soldering Station. 4. Plug Soldering Station into any standard, 120V AC electrical outlet.
5. Place Handle in the Handle Rest (black socket) and wait 20 seconds until Soldering Tip heats up. Work piece set up 1. If wires are to be soldered, thoroughly clean and scrape the wires so that only the clean copper is showing. Splice wires that are to be soldered together. 2. If other metals are to be soldered, thoroughly clean and scrape the metal surfaces. It may be necessary to apply acid flux (not included) to clean the metal surfaces before soldering. 3.
2. Check to be sure the objects being joined will not be damaged by the heat of soldering. This tool generates a temperature up to 896°F. Test a scrap piece or inconspicuous area of your work piece with the soldering tip before proceeding. 3. Be sure the surfaces being soldered are clean before beginning. If necessary, use a soldering flux (not included) for cleaning. Apply the flux to the parts being joined, and heat the parts until the flux burns away. 4.
(4), and unplug the tool from its electrical outlet before performing inspection, maintenance, or cleaning procedures. Damaged equipment can fail, causing personal injury. Do not use damaged equipment. If abnormal noise or vibration occurs, have the problem corrected before further use. Cleaning, maintenance, and lubrication 1. BEFORE EACH USE, inspect the general condition of the tool.
Part PARTS LIST & assembly diagram Description Qty 1 Upper Cover 1 2 Base 1 3 Panel 1 4 Power Switch 1 5 LCD Display 1 6 Cord Connection 1 7 Anti-Static 1 8 Temperature Dial 1 9 Cushion 1 10 Power Wire Group 1 11 Transformer 1 12 PCB Board 1 13 Radiator 1 14 Screw Sleeve 1 15 Soldering Iron 1 16 Tip Retainer 1 17 Heating Contact 1 18 Heat Wire Group 1 19 Grounding Spring 1 20 PCB Board 1 21 Handle 1 22 Handle Sleeve 1 23 Handle Tip Sleev
LIMITED 90 DAY WARRANTY Harbor Freight Tools Co. makes every effort to assure that its products meet high quality and durability standards, and warrants to the original purchaser that this product is free from defects in materials and workmanship for the period of 90 days from the date of purchase.