
Installation manual


A-2
ChargePoint® Charging Stations
Casting into New Concrete
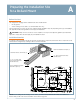
Before casting into new concrete, review the site for suitability to install a CT4000. The CT4000’s Clean Cord Technology
requires space behind the power stub-up for the Cord Management Kit (CMK). To ensure adequate space, refer to the illustra-
tions below and to the CT4000 Installation Template (75-001094-01) included in this installation kit.
IMPORTANT:
• Always check local codes to ensure compliance. You may need to adjust these instructions to comply with codes that
apply at your installation location.
• The concrete block must measure at least 24” on all sides.
• The bolt threads must extend 3” above the concrete.
• The conduit must be at least 1 ½” in diameter and extend 12” to 24” above the concrete.
• Refer to the CT4000 Installation Guide for detailed installation instructions.
Kit Components Needed
You will need the entire contents of the CT4000 Concrete Mount Kit.
Follow These Steps
1. Install two nuts, with two washers captured between them, onto each of the three bolts, as illustrated. Lock them
together so the lower end of the upper nut is located 6 - 6 ¼” from the bottom of the bolt. This sets the length of the
exposed threads.
2. Insert the three bolts through the Plastic Bolt Installation
Template. This ensures the relative position of the bolts and that
the flange of the pole fits over the bolts.
3. On the bottom of each bolt, install a nut, a washer, and a nut.
Lock the two nuts together so that the lower nut aligns to the
bottom of the bolt.
4. Immediately after pouring the concrete, push the bolts into the
concrete 6” deep, as illustrated. Ensure correct alignment and
that the top 3” of the bolts remain exposed. Rotate the bolts as
you insert them to draw concrete into the threads.
NOTE:
• It is important to rotate the bolts as you insert them. This
allows the concrete to fully coat the threads of the bolts,
reducing the amount of trapped air.
• The Plastic Bolt Installation Template template can be left
in place.
5. When the concrete is fully set, remove the upper nuts and one
washer to install the bollard’s mounting post.
You are now ready to install the CT4000’s bollard mount. Refer to
the CT4000 Installation Guide.
24” (600 mm)
3” (75 mm)
6”
(150 mm)