
Assembly Instructions


16
Customer Helpline 0343 515 1906
Setting the Cutting Heights (continued)
Operating Instructions & Tips
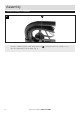
To remove the cutting head and fan (Fig. 8)
• hold the fan
14
rmly and twist the cutting head
13
anticlockwise as illustrated. Hold the cutting
head
13
in the centre and remove as illustrated . Hold fan
14
in the centre and remove as
illustrated.
• Inspect for damage and clean as necessary before replacing the fan and the cutting head.
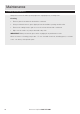
To refit the fan and set the cutting height (Fig.9)
• Replace the fan
14
as illustrated on to the motor drive shaft. Position the cutting head
13
onto
motor drive shaft according to the height of cut you need. Position the blades ush with the fan if
you want the higher setting (33mm). Turn the cutter head
13
the other way around, with a larger
space between the fan
14
and the cutting blades, if you want the lower cutting height setting
(10mm). Hold the fan
14
rmly and twist the cutting head
13
clockwise as illustrated. Ensure it is
securely locked into position.
IMPORTANT! Always ensure the fan and cutting head are correctly located on the drive shaft and
securely locked into position. If the blade has broken, it will be difcult to take it off by hand, or even
may hurt your ngers, so it is necessary to wear gloves or other protective equipment to prevent
harming your ngers.
8
13
14
9
13
14
14
13
14
13