
Instruction manual


25
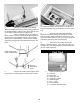
1. Gather the necessary parts:
(1) Radio switch
(1) Switch mount
(1) Switch cap
(1) Switch mount bolt
(1) Switch push-pull
(2) #2 washer
2. Remove the screws and the switch cover
(if your radio has one) from the top of the switch.
3. Using the screw that you just removed and
the #2 washer, put the switch mount together, as shown.
The switch mount has one slotted hole and
two holes on the other side. Mount your switch so that the
switch itself will move back and forth and you can feel and
hear the click.
4. Locate the hole on the left side (as you
look out the windshield) of the fuselage and make an "X"
cut in the covering. Push the switch mount bolt through the
hole.
5. Place the switch unit on the screw on the
inside of the fuselage, as shown.
6. Insert the push-pull mechanism through
the center hole in the switch mounting bolt and place the
switch cap over the switch. Screw the push-pull into the
cap. Test for good movement.
NOTE: There is a small hole on the side of the switch cap
for the push-pull to screw into. Also, the switch has two dif-
ferent size holes in the top and bottom to enable it to fit
over large or small switches. Choose the opening that best
fits your switch and allows it to move easily in and out.
RADIO SWITCH
INSTALLATION
The switch holder shown is not included in the
kit. You can purchase the switch holder at your
local hobby shop. For installation without the
switch holder, cut a hole through the side of the
fuselage to mount the switch.