
SELPHY ES1 User Guide


36
When [Speech Bubble] is selected
First perform steps 1 to 3 on page 32, then proceed to step 4 below.
8
Press the SET button and check the
settings.
z
Press the or button to select the number of prints.
z
Press the EDIT button to set various useful functions
(p. 48).
9
Press the PRINT/STOP button.
z
Printing starts. During printing, the printer’s power button blinks green.
z
You can also start printing by pressing the SET button.
4
Press the or button to select the image to
print and press the SET button.
z
You can switch the image display to index playback,
enlarged display and other displays (see Single Photo Print
step 2 on page 28).
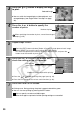
5
Press the , , or button to select the
speech bubble and press the SET button.
6
Press the , , or button to adjust the
position of the speech bubble.
z
If you press the or button, you can rotate the
position of the “tail” of the speech bubble in a maximum of
eight steps.
z
You can change the color of the speech bubble by pressing
the EDIT button. Press the or button to select the
color, and press the MENU button.
7
Press the SET button and check the
settings.
z
Press the or button to select the number of prints.
z
Press the EDIT button to set various useful functions
(p. 48).
Print preview
Print preview