
Projecting an Image in the DICOM SIM Mode


192.168.0.10
Step 5
Step 6
Step 4
Step 2
Step 3
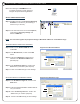
Step 1: To nd the default IP address on LV-projector,
PRESS the Menu button.
PRESS the right-arrow button and scroll
over to the Reset tab.
Step 2: Scroll down and SELECT Network settings,
then PRESS the OK button.
Step 3: Here is where you will nd the default IP
address for the LV-projector.
NOTE: In order to change the projector’s IP
address, your computer’s IP address
must be in the same network as the
projector.
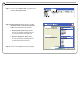
Step 4: Open up Internet Explorer and TYPE in the
projector’s IP Address.
Step 5: Change the IP Address and Subnet Mask to
a NEW IP Address within your network.
Step 6: CLICK on the Update button to save changes.
III
CHANGING THE IP ADDRESS ON LV-SERIES PROJECTORS
Step 1