
User Guide


F. Adjustment Mode [3]
To start adjustment mode, press ‘3’ (keypad) and the OK key in sequence.
To select an item, press the number (keypad) and the OK key in sequence.
To change the setting, press the number (keypad) or the zoom (+)/(-) key and the OK
key in sequence.
• Press the % key to enter a negative number.
To delete an item, press the Clear key.
• A press on the Copy Start key while the service mode description is being
shown starts copying operation.
CHAPTER 11 TROUBLESHOOTING
COPYRIGHT © 1997 CANON INC. CANON NP6330 REV.0 MAY 1997 PRINTED IN JAPAN (IMPRIME AU JAPON)
11-171
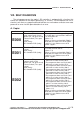
No.
301
302
303
304
305
306
307
308
311
312
313
Description
Scanning lamp intensity
adjustment
Developing bias DC component
adjustment
AE mode newspaper original
DC bias adjustment
AE mode scanning lamp
activation voltage automatic
adjustment
Leading edge margin
adjustment
Leading edge non-image width
adjustment
Trailing edge non-image width
adjustment
Left/right margin adjustment
Multifeeder paper width
detection reference point 1
Multifeeder paper width
detection reference point 2
Multifeeder paper width
detection reference point 3
Remarks
A higher setting obtain darker
copies.
See p. 11-18.
See p. 11-17.
See p. 11-16.
A higher setting delays the timing
at which the registration clutch
turns on, thereby decreasing the
margin.
unit: 0.36 mm
A higher setting delays the timing
at which the blank shutter solenoid
turns on, thereby increasing the
non-image width.
unit: 0.36 mm
A higher setting delays the timing
at which the blank shutter solenoid
turns off, thereby decreasing the
trailing edge non-image width.
unit: 0.36 mm
A higher setting increases the
left/right margin.
unit: 0.36 mm
Use the keypad.
Use the keypad.
Use the keypad.
Settings
0~255
-25~25
0~255
0~255
-127~127
-127~127
-127~127
-30~30
0~255
0~255
0~255
Download Service Manual And Resetter Printer at http://printer1.blogspot.com