
User`s guide


1-137
Configuring Send Settings (Send Settings)
Various Sending Methods
1
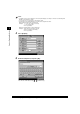
If Access Number Management for an Address Book is set to ‘On,’ press [Access Number] and
enter the access number to specify the address, and press [OK]. If you do not want to specify an
access number, press [No Access Number]. (See “Storing New Addresses (Store/Edit Address
Book),” on p. 4-5.)
The specified mode is set, and the display returns to the Send screen.
NOTE
• For recipient’s settings, see “Specifying a Destination Using the Address Book (Address Book),” on p. 1-34.
• You cannot select multiple destinations.
4
Press .
The machine starts scanning.
When the original is placed on the platen glass, follow the instructions that appear on the touch panel
display. Press one time for each original. When scanning is complete, press [Done].
When scanning is complete, the document is sent to the specified destination.
When the sending job is complete, a <Job Done> notification is sent to the specified e-mail address.
NOTE
• To cancel the settings, press [Job Done Notice] ➔ [Cancel] in this order.
• If Preview is set to ‘On’, you can preview the images of documents before sending.
(See “Previewing Originals (Preview),” on p. 1-168.)
• To cancel all settings at once, press . (The machine returns to the Standard Scanning mode.)