
Operation Manual


15
Before You Start Using This Machine
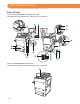
1
USB Port (1)
Use the USB port to connect a USB device.
2
Control Panel
Includes the keys, touch panel display, and indicators required for
operating the machine. (See “Control Panel and Touch Panel Display,”
on p. 18.)
3
Main Power Switch
Press to the “I” side to turn the power ON. (See “Control Panel and
Touch Panel Display,” on p. 18.)
4
Security Key (Optional)
For managing the use of the machine and preventing unauthorized
copies.
5
Multi-Purpose Tray
Use the multi-purpose tray to feed paper manually, and for loading
nonstandard paper stock, such as envelopes.
6
Main Unit’s Lower Right Cover
Open this cover when clearing a paper jam inside the main unit.
7
Main Unit’s Upper Right Cover
Open this cover when clearing a paper jam inside the main unit.
8
Paper Drawer 3, 4
Holds up to 550 sheets of paper (20 lb bond (80 g/m
2
)).
9
Paper Drawer 1, 2 (Right/Left)
Holds up to 1,100 sheets of paper (20 lb bond (80 g/m
2
)).
10
LAN Port
Use a LAN cable to connect the machine to a network.
11
USB Port (2)
Use the USB port to connect external hard disks and other devices to
the machine.
12
USB Connector
Use a USB cable to connect the machine to a computer.
13
Left Cover
Open this cover when clearing a paper jam inside the main unit.
14
Breaker
Detects excess current or leakage current.
15
Test Button
Press this button to periodically test the circuit breaker.
16
LINE 4
Use this port to connect the Super G3 3rd/4th Line Fax Board to the
machine.
17
LINE 3
Use this port to connect the Super G3 3rd/4th Line Fax Board to the
machine.
18
LINE 2
Use this port to connect the Super G3 2nd Line Fax Board to the
machine.
19
LINE 1
Use this port to connect a fax line to the machine.