
User Manual


46
2
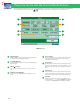
Selecting■Function
Select■[Scan■and■Store]■from■the■Main■Menu■screen.
Press [Scan and Store].
Select [Memory Media] from the screen where you can select the
type of storage location.
This section describes the ow of basic Scan and Store operations. It also describes an example of how to store scanned data in memory
media.
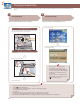
Storing Scanned Data
1
Placing■Originals
Place■the■original■on■the■feeder■or■the■scanned■glass.
Placing■originals■in■the■feeder
Adjust the slide guides to t the size of your originals. Neatly place
your originals with the side to be scanned face up.
Placing■originals■on■the■platen■glass
Open the feeder.
Place your originals face down.
Gently close the feeder.
• If a log in screen for Department ID
Management or SSO-H appears, you
must enter the applicable authentication
information (ID, password/PIN). If the Copy
Card Reader-F1 is attached, rst insert a
control card.
• If a login service such as Department ID
Management or SSO-H has been set, press
(Log In/Out) to log out.
• To use memory media, specify the following settings in advance.
1. Press (Settings/Registration).
2. Press [Preferences] → [Display Settings] → [Store Location Display Settings].
3. Select [On] for <Memory Media>.
4. Press [OK].
• To save the scanned data to memory media, connect a USB memory to the USB port.
• For information on the supported memory media, see e-Manual > Scan and Store.
• To access the Network (Advanced Box) see "Setting Up an Advanced Box on the Network" in the Setup Guide.