
Fax Driver Guide


Installing the Software
2-11
2
Getting Started
NOTE
•
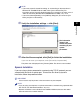
If you want to specify shared fax settings, or are installing an alternate driver in
Windows NT 4.0/2000/XP/Server 2003, select [Use as Shared Fax]. For
instructions on how to specify detailed settings for a shared fax, see steps 2 to 4 of
"Alternate Fax Driver (Windows NT 4.0/2000/XP/Server 2003)," on p. 2-18.
•
If you have selected [Network] in the [Add Port] dialog box, you cannot set [Fax
Name] and [Use as Shared Fax].
13
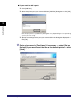
Verify the installation settings ➞ click [Start].
14
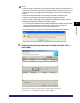
After the files are copied, click [Exit] to finish the installation.
If you want to restart your computer, select [Restart My Computer Now].
The printer icon is displayed in the [Printers] folder. The driver is now installed.
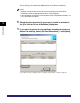
Dynamic Installation
If you are using a printer connected to a network using TCP/IP protocol, you can
automatically search for its printer port. To install the fax driver by dynamic
installation, follow the procedure below.
IMPORTANT
You can search only for printers in the same subnet as your computer.
NOTE
•
If you are using a local printer or a printer connected to a network using a protocol other
than TCP/IP, see "Standard Installation," on p. 2-3.
•
Dynamic Installation is not available for the LASER CLASS 510, because this model
does not come with a network interface.
The information
shown in the
window may differ
according to your
system
parameters.