
User Guide


COPYRIGHT © 1996 CANON INC. CANON GP215/200 REV.0 JULY 1996 PRINTED IN JAPAN (IMPRIME AU JAPON)
5–40
5. INSTALLATION
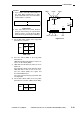
9) Select the appropriate control type as follows:
9-1) Set the control type using the Keypad-A1.
Press / so that appears.
9-2) Set the control type number to suit the type
of copier and the needs of the user by refer-
ring to Table 5-505.
Table 5-505
9-3) To select '3' for control type,
1. appears. Since the initial set-
ting is '1', change the control type number
to '3'.
Press the 3 key.
To clear the input value, press the C key,
and try again.
2. When has appeared, press the
key.
3. When has appeared, press the
key.
3. appears, and the cursor flash-
es for a while during formatting. The control
type will be set to '3' when the flashing
stops.
Caution:
Setting a new control type number will clear
the unit price, upper limit value, counter
reading, and ID number, requiring you to re-
enter them.
10) Set the control paper size as follows:
10-1)Change the control paper size using the DIP
switch on the Copy Data Controller-A1 and
the Keypad-A1.
To continue to use the existing control paper,
go to step 11).
10-2)Press the / key to scan through the
paper sizes. ('OTH', however, will not appear,
since it cannot be changed.)
EX 1
1. appears.
2. Press the key.
3. appears.
4. Press the key.
5. appears.
6. Press the key.
7. appears.
8. Press the key.
9. appears.
10. Press the key.
11. appears.
EX 2 Changing B4 to LGL for Control Paper
Size 3
1. Press the / key so that
SIZE3=B4 appears.
2. Find the size for LGL from the conver-
sion code table (Table 5-506), and press
1 and 3.
3. appears.
4. Press the key.
5. appears to end the
change.
SIZE 3 =LGL
No. No. of groups Paper size Mode
–
One-sided
/two-sided
Mono
/2-color
/full-color
5
5
5
3000
1000
1000
1
2
3
ESC
ESC
FORMAT=1
FORMAT=1
SIZE 1 =A3
SIZE 3 =B4
SIZE 4 =B5
SIZE 3 =B4
SIZE 3 =B4
SIZE 3 =13
SIZE 2 =A4
SIZE 2 =A4
FORMAT=3_
FORMAT=3_
FORMAT=3_
ENT