
User Guide


COPYRIGHT © 1996 CANON INC. CANON GP215/200 REV.0 JULY 1996 PRINTED IN JAPAN (IMPRIME AU JAPON)
5–28
5. INSTALLATION
Work
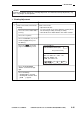
Press the key to turn
pages to the 200PWM Density
Automatic Adjustment screen.
Perform 200PWM density auto-
matic adjustment.
• Work as shown for PD density
adjustment.
Press the key to turn
pages to the 600PWM Density
Automatic Adjustment screen.
Perform 600PWM density auto-
matic adjustment.
• Work as shown for PD density
adjustment.
Press the Reset key twice.
Place the Test Chart (NA-3) on
the copyboard glass, and close
the front cover halfway.
Then, make copies at copy densi-
ty 5 in text mode, test/photo
mode, and photo mode.
• Try all the cassettes and the
multifeeder.
Remarks
■ Optimum Images
• For text mode, the white background must be free of
fogging.
• In text/photo mode, step edge No. 10 must be barely
visible and the white background must be free of fog-
ging.
• In photo mode, the white background must be free of
fogging. (Moire around step edges around halftone
bands may be ignored.)
No.
2
3
4
5
6
7
CANCEL
+
OK
*4* FUNCTION 05
200PWM PRINT (START)
WHITE MEASURE (OK)
DENSITY SANPLING (OK)
DATA SET
A=+xxx, B=+xxx, D=+xxx
xx xx xx xx xx xx xx
xx xx xx xx xx xx xx
MULTI 0
>CASSETTE1 A4 1
CASSETTE 2 A4 1
–
CANCEL
+
OK
*4* FUNCTION 06
600PWM PRINT (START)
WHITE MEASURE (OK)
DENSITY SANPLING (OK)
DATA SET
A=+xxx, B=+xxx, D=+xxx
xx xx xx xx xx xx xx
xx xx xx xx xx xx xx
MULTI 0
>CASSETTE1 A4 1
CASSETTE 2 A4 1
–