
Fax Machine User Manual


5-45
FAX-L1000 Chapter 5: Appendix
2.1.3. Operation
a) Connecting to the printer
NOTE
Before handling the printer driver tester, make sure to touch metallic parts of
the printer to discharge electrical static as it may cause malfunctions or
failures in the printer and the tester.
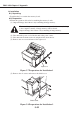
Figure 5-5 Connect Printer Driver Tester
(1) Disconnect the power cord.
(2) Connect the connector 1 of the tester to the envelope feeder connector in the printer. The
seal on the connector 1 should be facing up when connected to the envelope feeder
connector. Connect it to the duplexing unit connector on the back to check the envelope
feeder operation. The seal on the connector 1 should be facing right (the left cover side)
when connected to the duplexing unit connector.
(3) Connect the power cord and operate the tester when the printer enters the standby mode.
NOTE
Note that the connector of the tester fits into the connector on the wrong side.
If the LEDs on the tester do not light up when conducting the step 2.1.3,
reconnect the connector the other way around.
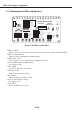
LED17
Communication
SW15
Reset
CANON INC
MADE IN JAPAN
RY9-0124
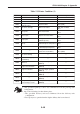
Cassette
Analog Data
Reserved
Service Error
Operation Error
Jam
Option Sensor
Sensor/Switch
Reserved
00
0
0
0
0
1
1
0
0
1
1
1
1
1
1
0
1
0
1
0
1
0
1
SW1
SW1
SW1
Cassette Pick-up
Envelope Feeder Pick-up
Paper Feeder Pick-up
MP Tray Pick-up
Reserved
Cassette Pick-up
Operation
Test Print
Density Ajust.
Operation Mode
Select
SW1
0
1
0
SW2
1
0
0
All Black
All white
Horizontal lines
Vertical lines
1
1
0
0
SW7
1
0
1
0
SW6
1
0
0
0
1
1
0
1
0
0
0
SW5
SW6
SW4
1
0
1
0
SW3
Normal
F1
F5
F9
0
1
00
0
0
0
0
1
1
0
0
1
1
1
1
1
1
0
1
0
1
0
1
0
1
SW4
SW5
SW3
0
SW14
SW13
SW12
Display Select
PRINTER DRIVER TESTER
JC1
Connector 1 Connector 2