
Operation Manual


34 Using the Scanner
Using the Job Function
The job function allows you to scan merely by pressing the [Scan] button on
the scanner according to the Windows event function and job tools.
Scanned image data is automatically processed by the function registered to
the [Job] button by the Job Registration Tool.
Select and register one of the following four functions to the [Scan] button.
• Save as file
Scanning is performed according to preset scanning conditions, and image
files are saved to a specified folder.
•Print
Scanning is performed according to preset scanning conditions, and image
files are output on a specified printer.
• Attach to E-mail
Scanning is performed according to preset scanning conditions, e-mail
software is started up, and scanned images are attached to a new e-mail.
• Launcher
The application selected by [Setting the Event Function] (See p. 37.) is
started up.
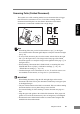
Save as file
Image files are saved
to a specified folder.
Print
Image files are printed
on a specified printer.
Attach to E-mail
e-mail software is started up
and image files are attached to
a new e-mail massage.
Launcher
The specified application is
started up.
(network)
(mail server)
Scan button
DR-2050C/
DR-2050SP