
Copier User Manual
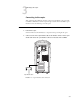


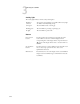


Table Of Contents
- ColorPASS-Z6000/PS-NX6000 Color Server Installation and Ser vice Guide
- Contents
- Preface
- Chapter 1: Introduction
- Chapter 2: Preparing for Installation
- Chapter 3: Connecting the ColorPASS
- Chapter 4: Service Procedures
- Chapter 5: Troubleshooting
- Appendix A: Specifications
- Appendix B: Replacing top and side plastics
- Index

3-6
3
Connecting the ColorPASS
TO PRINT A CONFIGURATION PAGE
1. Power on the copier and allow it to warm up.
2. Make sure the Service Mode COPIER>OPTION>REMOTE on the copier is set to “2.”
3. Power on the ColorPASS by pressing the power button on the front panel (see page 3-1).
4. At the Idle screen, press the Menu button once (see “Using the Control Panel” on
page 3-9). The Functions menu appears.
5. Press the line selection button to the right of Print Pages, and then select
Configuration page.
The ColorPASS sends the Configuration page to the copier and displays the RIP and
Print status screens so you can monitor the job.
Print Pages
Scan Job
Suspend Printing
Resume Printing
Functions
Use the Up and Down buttons to
scroll through these options. Use
the line selection buttons to the
right to select Print Pages.