
User Guide


COPYRIGHT
©
1999 CANON INC. CANON CLC1120/1130/1150 REV.0 MAR. 1999 PRINTED IN JAPAN (IMPRIME AU JAPON)
7-73
CHAPTER 7 PICK-UP / FEEDING SYSTEM
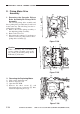
VIII. DISASSEMBLY/ASSEMBLY (TRANSFER
ASSEMBLY/DELIVERY ASSEMBLY)
The copier possesses the mechanical characteristics discussed in the following pages; go
through the instructions given when disassembling/assembling the copier’s parts while keeping the
following in mind:
1.
Disconnect the power plug before disassembly/assembly work.
2. Assemble the parts by reversing the steps used to disassemble them, unless otherwise
noted.
3. Identify the screws by type (length, diameter) and location.
4. Do not leave out the toothed washer that comes with one of the mounting screws on the rear
cover to protect against static electricity.
5. Do not leave out the washer that comes with the screw used for the grounding wire and the
varistor to ensure electrical continuity.
6. Do not operate the machine with any of its parts removed, unless otherwise mentioned.
7. Keep in mind that the laser shutter is designed to close in response to the left door switch
(i.e., when it turns off as when the left front cover is opened). If you must operating the
copier with the left front cover open, you will need to insert the door switch actuator into
the left door switch. (Do not insert a screwdriver or the like into the laser path.)
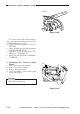
8. The one-way clutch is in operation while the transfer drum is on the transfer drum frame.
Do not rotate the transfer drum while keeping your fingers in an opening of the transfer
drum.
The transfer drum, on the other hand, will rotate in reverse when it is off the frame. Keep
this in mind. (Allowing it to rotate in reverse can damage the transfer blade, attraction
brush, and transfer drum side scraper.)